Search A n R

Showing posts with label guest post. Show all posts

Friday, March 30, 2012

Guest Post ~ Richa's Vegan Marble / Zebra Cake

I am happy to have Richa of Hobby and More here at AnR. She is a very popular Vegan food blogger, dog lover and an awesome human being who has her pretty head over her shoulders. :)..I love her approach to food and the effort to keep the recipe simple. Her pictures are amazing and actually motivate you to try the recipe. I am in awe of her baking skills. Breads, cakes, and cookies are just a few of her specialties. Here is a sample of her awesomeness!!

Over to Richa :)
-----------

Thank you Sudha for sharing your space with me today! I love your passion for design, your constant efforts to keep this world greener and pollutant free, and Indian comfort food at Avial and Rasam. Keep on with your green efforts and hopefully we will make this world plastic free someday.
Today we are talking about baking with different types of flours. I made 2 versions of this marbled Zebra cake. One had been sitting in my drafts waiting for the second version. The first version has all purpose flour and whole wheat pastry flour, pantry items easily available in the US. The second version uses freshly milled soft white wheat berries. The lighter pictures are the AP version, and the deeper light brown layers are whole wheat version. Dont let this write up scare you, the recipe is short and sweet.:)

For a long time I was always confused about all the different types of wheat flours(Its not like I am completely sure right now :), but I figured it out enough to know what I like where after trials and errors. We have a whole bunch of options with Whole Wheat flour, Whole Wheat pastry flour, Cake flour, Bread flour, Atta(Indian wheat flour), maida(indian all purpose flour) and more! What to you use where?
Cake flour has the lowest gluten, soft wheat and finely milled.
Bread flour is a blend of high gluten hard wheat varieties and is coarser than all purpose flour,
Whole wheat flour is high gluten hard wheat.
Whole wheat pastry flour is soft wheat, low gluten.
All purpose flour is processed fine and a mix of low gluten soft wheat and high gluten hard wheat
Atta(Indian whole wheat flour used for roti/chapati) is hard wheat, milled finer than whole wheat flour and has higher gluten than all purpose flour. Atta can be used in yeast breads but tends to make cakes, quick breads, muffins etc harder and coarse because of the gluten formation while mixing.
To get a complete picture, check out this article on Indiacurry. and some more wheat flours on wiki here
For cakes, quick breads, muffins, the best option usually is Cake flour or all purpose flour.(lower gluten)
For healthier versions, use Whole wheat pastry flour or any other whole grain flour which is low in gluten or mix in some glutenfree flours.
If you can find soft wheat and mill it or make flour yourself, then you can mill a finer version and use that too. I got a Blendtec and made my own flour with soft white wheat berries and made wheat only version of this cake which didnt make a stiff batter or a tough cake! The flour when milled was somewhere between AP flour and whole wheat pastry flour in terms of texture and the batter was actually more flowy and predictable than the one with the pastry flour.
Find me on Facebook, Twitter and Pinterest.
8 inch cake pan
Ingredients: with AP flour
1 Tablespoon flax meal
2 Tablespoons virgin coconut oil, melted
3 Tablespoons organic canola oil
1 cup water
2 Tablespoons orange juice
1/2 teaspoon vinegar
8 Tablespoons raw sugar
1 cup all purpose flour
1/2 cup whole wheat pastry flour
1.25 teaspoon baking powder
1/8 teaspoon salt
Spices: 1/4 teaspoon cinnamon, 1/4 teaspoon ginger powder, 1/8 teaspoon cloves powder
3+ Tablespoons cocoa powder
Ingredients with home milled soft white Whole wheat flour.
1/2 cup water
7 Tablespoons raw Sugar
1 Tablespoon light agave
1 Tablespoon coconut milk
1 Tablespoon Apple Cider Vinegar or 1 teaspoon vinegar
1/4 cup organic canola oil (or half virgin coconut and half organic canola oil)
1/8 teaspoon salt
1 and 1/4 cup soft white whole wheat flour
1.25 teaspoon baking powder
2-3 Tbsp cocoa powder
Spices: 1/4 teaspoon cinnamon, 1/4 teaspoon ginger powder, 1/8 teaspoon cloves powder or add vanilla extract

Method:
In a bowl, whisk all the wet ingredients, salt and sugar until well combined. (Add flaxmeal to the wet for AP version)
In another bowl, whisk the flours, baking powder and spices and add to the wet ingredients.
Whisk until just about combined into a flowy batter. Use a few teaspoons more water or flour if needed, since the water absorption depends on the flours.
Transfer half of the cake mix to another bowl and add cocoa powder to it. Mix till combined.
The cocoa powder will thicken the batter a little, Add 2-3 teaspoons water to the cocoa batter to get it to the same consistency as the white batter.
Take 2 ladles or small bowls of the same size and pour a ladle of the white cake mix onto parchment lined or well greased cake pan.
Then pour a ladle of cocoa mix on top of the white mix.
Continue till all mix gets used up.
Bake in preheated 360 degrees F for 35-40 minutes until toothpick from the center comes out clean.
Serve as is, or topped with melted chocolate!


A huge thank you to Richa for this wonderful write and exotic pictures :). I am glad she agreed to be a part of AnR.  

Wednesday, January 18, 2012

Guest Post ~ Saravana's wood apple chutney


My Soul bro is back :). I had featured Saravana's Arati poovu fry / vepudu earlier. And now he is back with a yummy chutney. I have fond memories associated with this chutney ..Amma made them when these fruits were in season...i also love the juice she made...all organic and naturally sweet!!!!:). 


Over to Saravana
------------
Wood Apple Chutney:  VELAGAPANDU CHUTNEY
Wood Apple, also called as Velaga Pandu (వెలగ పండు) in Telugu and Vilam Palam (விளாம் பழம்) in Tamil.   We know this fruit as it forms a part of ornamentation in vinayaka chavithi, to tie fruits for palavelli.
Both ripened and unripe wood apple is used in savories. For the current purpose, we use a ripened wood apple. Wood apple has a thick shell and has to be broken. A ripened wood apple can be spotted from long from its ripe, sweet and a woody smell.  Take a wood apple (200 gm), break it and scoop the inside paste from it.  Add 3 green chilies, sufficient salt and tamarind and blend the paste so that the ingredients mix well.
Place a pan on the stove and add 1 tsp of oil / ghee.  Add the wood apple paste in it and fry it with a lid covered for 5 min on a low flame.

Wednesday, November 30, 2011

Guest Post ~ Saravana's Banana Flower Fry / Poriyal / vepudu

I met Saravana Kumar through a friend. In the few days of knowing him, I loved our common love for food and the will and interest..No..a strong need to experiment with ingredients. He is among those very few single men who can actually cook - really well! I need to mention his sense of humour and his meticulous (food experiments) documenting skills (I have been planning to do that for ever!!). I am so glad to have met another soul who has a holistic approach to food and cooking.

So over to Saravana.... :-)

Banana Flower Recipe
Banana Flower (Arati Puvvu in Telugu, Vazhai Poo in Tamil), which may also be called banana blossom, is used as a vegetable in India, especially in South India. It is known to have many medicinal values
Owing to its cumbersome process in cooking this flower, this recipe is not tied often. However, it is not so laborious process to cook this flower, if you have some practice. This flower is a classical example for acrid (vagaru in telugu,) taste.

Many cuisines add the sliced banana flower to meat stews, stir-fries, soups, and rice or noodle combinations. It is also used in cold salads, with the salad mixture presented to the diner in one of the large purple-red outer bracts.


How to peel the flower for use
I suggest coating the hands with cooking oil prior to working with it  
Banana flower consists of many layers of bracts or petals. Under the layer of each petal are a bunch of florets. Remove the hard pink petals and take out the florets found underneath. Once the tougher, darker outer bracts are pulled away, the paler and tender inner leaves are used in the recipe.

In each floret, you will find a string in the middle with a tiny head and also a small plastic like white cover around it. Both are not edible. Remove both from all the florets. The florets in the upper portion are slightly bigger than the florets in the inner portion. From the big floret, you can easily see these and remove it. But it is little difficult to find the string in the small florets. You have to open each small floret gently by your fingers and remove the string and cover. To do this, take a bunch of florets in one hand and hold the bottom and gently rub the top of the florets in your palm. Now the florets will open up and you will see the strings in each floret. Remove it. When you remove the hard layers, you will find the color of the bract will change from dark pink to a pale yellow and finally end up with a small white bulb The florets in the inner portion will be more tender. You can use the tender florets and the small white bulb as it is. No need to remove string or anything from these.

Then chop all the florets into tiny bits (you can whip them in a blender too) and put in water mixed with little butter milk till you cook the same. This will avoid discoloration of the florets.

And now for the Recipe
Ingredients
Banana Flower: 1 Large bulb / 500 grms 

Salt: to taste 
Spice:  Green Chillies - 3 small, slitted  
Tamarind Pulp / Paste - 2 tsps 
Buttermilk - just enough to soak the chopped florets

Tempering:
Asafoetida : 1 Pinch
Mustard Seeds: ½ spoon
Chana Dal – 1 spoon
Urad Dal  - 1 spoon
Curry Leaves -

Oil / Ghee  - 2-3 spoons 


The Recipe
Tempering:  Add oil in a wok or a pan. Add to it the usual spices, depending on your interest to make the curry as spicy as you like
Add Asafoetida, Mustard seeds, Bengal Gram and Black Gram and fry till they become brown. You can add sufficient amounts of green chilly slices, as per your requirement. Add the sliced florets to the above mixture and boil in a simmer. You can add a little water and boil the mixture till cooked, around 10 minutes on low flame.

Serving Suggestions
Serve hot, along with Rice or Rotis.  Accompaniments with this dish should be usually very tangy or spicy like pickles, chutneys or spicy salads which generally go well with acrid taste.

Other Dishes with Banana Flower:
Banana Flower in Curd - Perugu Pacchadi
Banana Flower Vadai
Banana Flower with Mango - a gravy 

Trivia
Banana Flower is used in many other cuisines, across many far eastern countries .


Actual lunch menu on the specific day: 
Rice (with urad dal called Mudganna) (center), with Banana Flower Curry (extreme right) along with Moong Dal (left) and Mango Ginger Chutney.


Served in Banana Petals


footnotes (courtesy wiki)
  • Banana flower is considered to be a good source of vitamins A and C. It is considered for its blood purifying qualities and is effective in curing Gynec disorders. It increases hemoglobin levels in the blood and is traditionally believed to be beneficial as a lactating agent.
  • The cut ends of the banana flower leak a sap that will stain skin and other surfaces black. The precaution of rubbing the hands with cooking oil makes cleanup easier. Exercise care while handling so that the flower does not stain your clothes.
  • Banana flower is also treated in several Asian and tropical cuisines as a vegetable. It is known in Japan as ‘Banana no tsubomi’, in Thailand as ‘dok kluai’, in Indonesia as ‘jantung pisang’, in China as ‘Shang chao fua’, in Sri Lanka as ‘kehel mal’. The words “banana flower” are variously translated as “banana blossom,” “banana heart,” or “plantain blossom.”
-----------
I appreciate Saravana Kumar to have taken time out to send me this wonderful write up.

Pics and content courtesy: Saravana Kumar

Friday, July 22, 2011

Guest Post ~ Lakshmi's Pumpkin Roti & Beetroot Dry Curry ~ You are invited!!

I bring to you a very yummy dinner menu from Lakshmi's Kitchen. We meet a few people in our life, with whom we seem to connect so well, and it feels like you have known them for ever. Lakshmi is one such person for me. After persistent efforts, I could get her to send in a recipe with a pic for my recipe box a.k.a. The food blog-avial n rasam :)

Here is what she sent me...:)

Pumpkin Chapathi
Ingredients:
•1 medium-sized cooked, peeled and well mashed yello pumpkin
•2 tsps coriander powder
•1 tsp cumin powder
•1/2 tsp cumin seeds
•1/2 tsp turmeric
•1 tsp olive oil
•Salt to taste
•3 tbsps finely chopped coriander leaves
•2" piece of fresh ginger grated fine
•4 cups whole-wheat flour
•Water to mix (1/3 cup of water)
Method
•Mix all ingerdients (mashed pumpkin, coriander and cumin powders, cumin seeds, turmeric,  salt to taste, chopped fresh coriander and grated ginger) into a large mixing bowl.
•Add the wheat flour, oil to all the ingredients (except the water) and prepare a dough of the mixture.Mix together very well
•Now slowly add water, a little at a time and knead well to make a smooth dough, Cover and set aside for an hour.
•Divide the dough into golf ball-sized portions and roll between your hands till they are smooth and without cracks.
•Very lightly flour a rolling board  and roll each ball into a round or triangle shaped piece. I always prefer to add more olive oil when I roll my chapathi


Beet Dry Curry
Beetroot(I used 4 medium)
Salt to taste
pepper powder - 4tablespoons
Diced Tomatoes - 1 cup
Diced Onions - 1 cup
Seasoning:
Channa Dal - 1 tsp
Urad Dal - 1 tsp
Curry leaves a few
Slit Green Chilli - 4
Oil - 1 tsp( I use Extra-Light olive oil)
Mustard- 1 tsp
Cumin - 1 tsp
Asafoetida - a pinch
Cloves 2
Cinnamon 1tsp
Fennel Seed 2tsp
Method
  •  Pressure cook  Whole Beets  till soft
  •  Peel the skin and chop, then Grate the Beet root
  •  Chopping beetroot is really tough before Cooking( I prefer to pressure cook it first)
  •  If you do not like to cook it with the skin on, you can quickly remove the skin and cook the whole beets.
  • Heat oil, add all seasoning ingredients , When the mustard pops, add the curry leaves and chopped beetroot.
  • Fry together and cook with a low-fire for 10 minutes
  • Finally add Diced tomatoes and Onions together and cook it for 3 minutes. I do not cook tomatoes and onion too much for this dry curry. I like the fresh onion smell in my curry.
Yummy!

Thursday, June 30, 2011

Guest Post ~ Aparna's Bread Baskets for Pot Luck!!

Aparna is one of my super cool buddies from my days in mumbai....we joined Global Trust bank together and were roomies while in mumbai..being in our early 20's was just one of the best things of those days!! As I have mentioned time and again, my food blog is my journal to document recipes, ideas from kitchens around me...I asked her to send in a guest post for the food blog...and here is a very yummy appetizer from her kitchen.

over to appu!

When we were little girls, my elder sister used to make bread toast. Even after all these years I remember the taste so fondly. So when one of my friends tried the vegetable bread Baskets from here, I wanted to try too.

I made about 60 bread baskets for a potluck party at a friends' place. Everyone liked them a lot and not one was leftover....

To make 12 bread baskets all you need is:


  1. 12 Bread slices
  2. 2 capsicums 
  3. 1 onion
  4. 1 tsp Mixed Italian herbs
  5. Salt and Balck Pepper to taste
  6. 1 bunch fresh corriander
  7. 2 jalapeno peppers
  8. 2 tsp lemon juice
  9. handful of peanuts
  10. tomato ketchup
  11. shredded cheese
How its made!!
  • Cut and remove the brown edges of the bread slices. Place each white slice in the muffin cup (spray the muffin cup with cooking oil or apply butter). Try not to break the slice and place it in such a way that it takes the shape of a cup.
  • Preheat the oven a 325 degrees. Bake these slices for about 15 min. 
  • Meanwhile, cut the onions and capsicum into small pieces and saute them in little oil. Add mixed Italian herbs, salt and pepper to taste. 
  • Cool the bread baskets. To make the green chutney, grind peanuts, corriander, jalapenos with little water. Add lemon juice and salt to taste. 
  • Spread this green chutney in each bread basket, put a spoonful of capsicum/onion curry in the basket. On top of the curry put some Tomato Ketchup and some shredded cheese in that order. 
  • Place them back in the oven and bake them until the cheese melts(it should take 5-7 min approx depending on the type of cheese used). Check once in between. Make sure the edges of the slices don't get burnt.
  • Serve it after cooling.


I used 3 colours of capsicum to make the presentation more colourful. You can make your own filling with your favourite vegetables.

---------
Thanks appu for the write up and wonderful pics...super yum!!!

Friday, June 3, 2011

Arisi (Rice) Puttu ~ Srilankan style

Made new friends after moving to this apartment. Great girls... among them is an amazing baker and cook, Sindhu. I plan to do a post on her cakes sometime soon...just waiting for a small Q&A session with her..:)..Coming to the post, Puttu is a very healthy and soulful breakfast food and is very popular in Kerala. I am used to rice and raagi puttu. This time around, Sindhu made rice puttu and I thought id document Sindhu's verison - Srilankan recipe, on Avial and Rasam. I found that the procedure being same, the only difference was the use of all purpose flour.

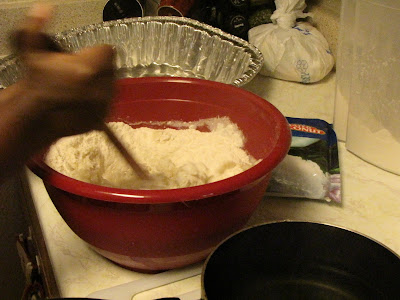
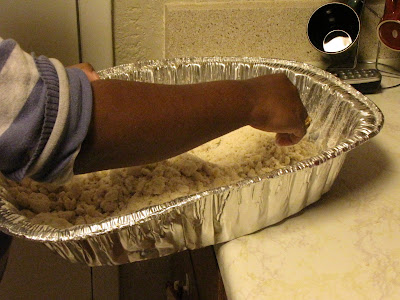
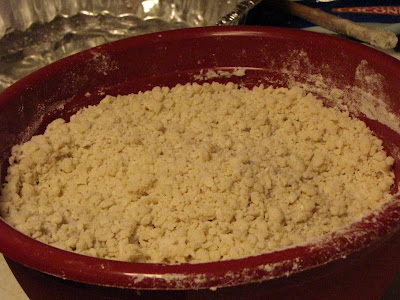
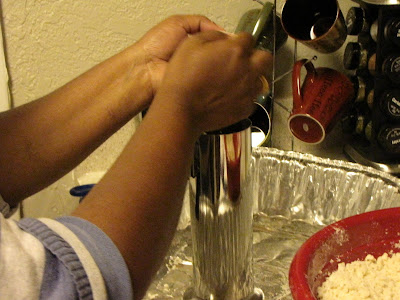
Procedure
Measure rice flour

Add all purpose flour, salt, and some hot water and blend into crumbly dough

lay out the dough and crumble it


this is how it looks after a nice crumbling session

Now getting ready to layer...she used store bought  frozen coconut.(shredded)


Layer the crumbled dough and coconut alternately to an inch below the top.


fill the puttu pot with water 

and put the filled puttu kozha (pipe)..:) on the pot


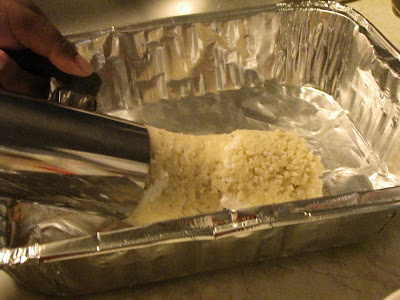
Let it steam for 8-10 minutes and roll it out to cool...I was uanble to resist the yummy puttu..so couldnt click pictures of the served plate (can you blame me!!)

serving suggestions: 
Chana, chole, Grazy subzi, chutney, soups or plain raitha ..it goes well with anything...i ll try posting the ragi puttu i generally make. Infact i also make broken wheat puttu..my hubby loves it..:)..Thank you Sindhu for letting me click the pics. I hope to feature a lot many more dishes from the Srilankan cuisine...waiting for you to oblige :)

Thursday, May 12, 2011

Guest Post ~ Anu Gummaraju's Picnic Menu

Please welcome back Anu Gummaraju of Scatter the batter. You saw her wonderful kitchen in my previous Heart(h) and Home post. She is among the most enterprising and enthusiastic momz I know. I am glad she responded to my request for a guest post. I like her ideas and simple tips to make even a simple breakfast real hit!!. For the guest post, she sent in her cool tips and ideas. I loved her write up..I am sure you will too :)


Over to you Anu....
------


For some, it means mangoes. Nimbu paani (fressssssshhhhh lime juice) to others. Iced lollies to kids (to me too, matter of fact). Sliced cucumbers sprinkled with salt and chilli powder to still others. Tall cool glasses of iced tea or chaas (flavoured, spiced buttermilk).. well, you get the drift, it's summer time!


Hi,  this is Anu from Scatter the Batter, very sheepishly writing this guest post for Sudha, who's the most patient blogger friend I have . I connected with Sudha over, what else, food! And I was amazed at the other passions that Sudha has and is so committed to. Her green crusade is inspiring. Her design blog manna for the design-soul.  Took me a while to get this down for Avial and Rasam, but I do hope you enjoy it.


I thought and thought about what to write and then said, why not a full fun menu for a summer picnic? We just had one today and it's cool to be sharing some of what we enjoyed picnic-ing on today.


No fun in the sun is complete without ice candy! In fact, it's great to start a picnic with this. Gets the kids in a happy mood. I'd found just the ideal popsicle makers at Howards Storage in Bangalore. The straws are great for slurping up all the melted candy juice. 


Decided to make double flavored candy for double the fun! Poured in litchi juice up to half the level of the Popsicle holders. Froze that. Chilled watermelon juice and poured that over the frozen litchi. Then stuck the sticks in. Froze again. (Tried semi-freezing the litchi first, but this didn't work. When I poured in the watermelon, the litchi part just came floating up, coz it wasn't firmly frozen I guess!) 


Try some fun combinations with contrasting colours like orange and purple grape, litchi and cola.. you get the idea!

For a quick starter, try a light egg scramble on french bread. Saute some onions, add salt and spice according to your taste, then add the eggs and scramble. Finish off with chopped coriander. Keep the french bread ready and sliced, top with the scramble and watch the kids scramble to get their hands on it!

Salads are great starters for a picnic too. Chunks of cucumber and tomatoes - any cool summery veggie you can think of will be great! Use chilled yogurt mixed with a mild spice like a dash of paprika or pepper for the dressing.

Pasta tossed in olive oil, chilli flakes and crushed garlic make a great main course, Also pasta with a mild tomato sauce. I find that loading a picnic basket with cheesy eats makes everyone go off to sleep right after that course on the mats...leaving the rest of the spread badly neglected. It's nice to keep it light!

A dessert of flavored yogurt again would go really well. But we had instant chocolate mousse! You can find the recipe here (http://scatterthebatter.com/2010/07/25/instant-chocolate-mousse/).

The temps did reach the high 30s methinks (C, not F!), but we kept our cool with all the coolness that comes from a perfectly planned picnic basket! Here's to a great summer to ya'll!
And thank you Sudha, for this awesome opportunity to chat with your readers :).

:)
Anu
http://scatterthebatter.com


--
Thank you for the lovely post Anu. I am sure the picnic was wonderful :). I am glad you shared your recipes on Avial and Rasam

Wednesday, June 23, 2010

Dum aaloo

I made dum aaloo sometime back and instead of posting my version, I wanted my friend Pooja to submit her recipe for a guest post. She obliged and sent me a picture and the recipe.


Dum Aloo recipe

18-20 small-sized potatoes
Oil to deep fry
½ tspn red chili powder
2 cups of yogurt
1 tspn coriander powder
1 tspn of dry ginger powder
1 tblspn of fennel powder
5-6 cloves
Salt to taste
tspn of roasted cumin powder
tspn of garam masala powder


Recipe
  • Boil the potatoes ( pressure cook -1 whistle )
  • Peel and prick the  boiled potatoes all over with the help of a fork. Heat oil in a kadai and fry the potatoes on medium flame till golden brown.
  • Whisk the yogurt with red chill powder ,salt, coriander powder, garam masala powder , dry ginger powder and fennel powder.
  • Heat 2-3 tbspn oil in a pan.
  • Add clove , half a cup of water and bring to a boil
  • Stir in the yogurt mixture and bring it to a boil
  • Add fried potatoes and cook till the potatoes absorb all the gravy and oil floats on top
  • Garnished with freshly roasted cumin powder(optional).

Serve with roti, parata or a bowl of steamed rice/jeera rice

Tuesday, May 4, 2010

Puliogare - Iyengar style

Pulihodarai /pulihora/ Puliogare is among my favorites. I am sure that every South Indian would love a traditional Style puliodarai anyday. I love all the four variations in the recipe - Telugu, Iyengar and the typical tamil styles. Though the recipe sounds and looks the same on the whole, we do have subtle variations.


The Iyengar style recipe is considered the most authentic. I wanted to do a post, but then met a very talented blogger - Veda. One look at her food blog, and I decided to request het to do a guest post. I loved her writing style and her approach to creating a very descriptive post. Veda's Iyengar's Kitchen has a great collection of authentic Iyengar style recipes and snippets for the kitchen. I was touched to see that she had dedicated her food blog to her Paati (Grandmother). This talented lady also blogs - Kai Kriye, where she shares her artistic creations including crafting, painting, and decor ideas. I was happy when she obliged and sent her recipe to be featured on Avial and Rasam.

Presenting her very well written recipe with equally appetizing pictures!
Veda's Iyengar Puliogare 


The quantity of the paste what you get from the below mentioned ingredients can be stored for a year in a good, tight container. It roughly fills up a 700 ml container.
Dark Tamarind – 1½ cups (darker the tamarind, better it is, because it gives that extra dark brown color to the ogare)
Oil - ½ cup
Mustard seeds – 1 tspn
Curry leaves – 3 strands
Asafoetida (Hing) - ½ tspn
Red chillies (Preferably byadigi variety) – 8
Rasam powder – 8 tbl spns
Salt – According to taste
Jaggery – 2 blocks

Ingredients required for mixing the rice with the Gojju to make puliogare:

The quantity of ingredients given here are for the amount of rice mentioned. It may vary according to your taste and quantity of rice.
Cooked Rice – 2 cups (separate the grains by spreading it on a large plate)
Oil - ½ cup
Mustard seeds – 1 tspn
Curry leaves – 4-5 strands
Asafoetida (Hing) – ½ tspn
Ground nuts– Quarter cup
Grated Dry coconut – 2 tbl spns
Pulioyogare gojju or concentrate prepared earlier – 3 tbl spns
Salt to taste

Powders for seasoning:Black Sesame seeds (Ellu in kannada and Til in hindi) – 1½ tbl spns (don’t add too much, although it enhances the flavors….it might get bitter if added in a large quantity)
Peppercorns – 1 tspn
Coriander seeds – 1 tbl spn
Rasam powder – 2 – 3 tbl spns

Preparation: Steps 1- 13 are how to make the gojju or the paste and Steps 14 – 18 how to mix the concentrate with rice.

Step 1, 2 and 3: Soak the tamarind previous night in little water (about 2½ cups of water). Next day extract the juice of the tamarind by grinding it in a blender. Blend it to a smooth paste and sieve it as shown in Step 3. Extract as much as possible. Step 2 is just to show how much jaggery is required for 1½ cups of tamarind. 
 

Step 4: In a large deep bottomed pan, take Oil, add mustard (allow spluttering), curry leaves, asafoetida, red chillies. Fry and add the tamarind paste extract. Allow it to boil.

Step 5: Add rasam powder once it boils. Reduce the flame. Keep it at Low. This is a very important step because the more it boils in a lower flame chances are it doesn’t get burnt. This step is also important because the whole idea of a concentrated paste is to allow it to concentrate slowly.
Step 6: Picture taken after 15 mins of boiling. Note how slowly the paste is getting concentrated. That’s the way typically puliogare gojju is prepared.

Step 7: Add salt and jaggery and continue to stir.

Step 8: We observed that we required more jaggery. How did we do that? Well tasted it of course!!!!

Again let me highlight this. It’s very important to taste it in between to check for the variations in the taste (less or more). Try imagining this! We want a combination of tanginess, spicyness and sweetness all in the above order. So try tasting and check what you need to add whether it is chilli powder or salt or jaggery. Try adding small portions. This way, you can be rest assured that you are not adding too much to mess up the taste. 
 Step 9, 10 and 11: Remember each picture taken here is after every 10 mins approximately. So the whole boiling process is about 1hr and 15 mins. That’s how long it should be boiled on a low flame to get the paste of desired consistency.

Steps 12 and 13: This picture is taken to show my readers just how the consistency should be. When you lift the ladle, the paste has to slowly fall back in to the pan. Again pictures are taken after every 10 mins. I wanted to time the whole process because it’s important for us to know just how long the boiling process is done.

After Step 13, you get a paste which is ready to be mixed with rice. At this point you can just store the whole paste if you are not going to mix with rice right away. The gojju or the paste can be kept in refrigerator up to one year. This is also one of the main reasons you have to boil for a long time because the shelf life is also longer.

If you plan to use the paste say after 1 month or more, the day you intend to use it keep the stored box out of the fridge and allow it come back to room temperature. (This will aid you in mixing with the rice more easily).

But if you plan to use the paste immediately proceed in the following way:

Step 14: Cook rice and separate the grains on a large plate. First wash the black sesame seeds, dry them well on paper towel. Fry them without oil in a small pan and when it splutters lightly, switch off the flame. Fry the coriander seeds and black peppercorns as well and grind them all together. Add this powder to the rice.

Step 15: Add grated dry coconut and rasam powder.

Step 16: Add the gojju (concentrated puliyogare paste prepared earlier)  


Step 17: Mix the rice with all the above powders and gojju first. IT’S VERY IMPORTANT TO MIX IT WITH HANDS. This is because all the flavors and the paste used get coated nicely on the rice. Then add the seasonings mentioned below.

Step 18: Take Oil in a small pan, add mustard seeds, asafoetida, curry leaves, ground nuts and allow them to splutter. Add this tempering to Rice. Taste it and add anything that’s less like salt, jaggery, etc...

Important Points:

Tamarind – Darker the better. Infact when we prepared, we weren’t able to get darker tamarind so that’s why the color is lesser. The original color of puliyogare has to be dark brown.

Red Chillies – The kind of red chillies we use is less spicy and gives more color. So that’s the reason we add the chillies and the rasam powder in large quantities. However not always can one find the same kind of chilli. So check for the spiciness of chillies that you use at home and then reduce or increase their number.

Rasam powder – It’s the base of a good puliyogare. Again we make this at home, so that it’s as authentic as possible. Many people prepare different kinds of rasam powders, so definitely the taste varies while mixing it in puliyogare. However you can always make a small batch of fresh rasam powder provided in the rasam powder link.

Black Sesame seeds – Always try to get a freshly manufactured packet. Because if it’s old and slightly smelly it could ruin your puliyogare. One very important point of black sesame seeds is that taste it before you use it in your puliogare. Because sometimes they can be bitter. If it’s bitter then don’t use it.

I know there are many people who are working and have kids to manage. Life can get busy when many such commitments are to be fulfilled. For such people, I would suggest to them to get the authentic iyengar puliyogare gojju mix from the condiment stores and try this with the rest of my preparation steps. I am not promising them that it will taste as authentic as the one mentioned above. However, you are still making an effort to make home puliyogare with the available ingredients.

My sincere suggestion to all my readers “Please experiment at least once with the above authentic recipe along with the gojju and you will never look back”!!!

It might take a while for one to master this, but then one has to start somewhere to get some practice right???? So there you go, I have revealed the most sought after recipe of Iyengars. Not that you haven’t seen many recipes of puliyogare on the net. But just that this one is from the IYENGAR’S KITCHEN.

Veda has inspired me to work on my style and methods to post a recipe. I have decided to create a blogroll to include vegetarian bloggers across the world, and Veda's blog is the first to be added to my food bloggers' list. Hope you enjoyed the post as much as I did compiling it. I am planning to make puliogare / tamarind rice this weekend.


Content and Pictures courtesy: Veda Murthy - Iyengar's Kitchen. I am sure you will love her blog and work as much as I do.

Thursday, April 15, 2010

Carrot Coconut Poli - Vishu Special

Wishing every one a very happy Tamil New year and Vishu. Pa`lakkad Iyers and Malayalis arrange a vishu decoration to begin the new year. We look into the mirror as soon as we get up and pray for a healthy, peaceful and a prosperous year ahead. A mirror arrangement, done the previous night, is made to reflect fresh green and yellow vegetables, fruits, flowers on a bed of rice and dal. Money, clothes (preferably white) and a tiny krishna idol also form a part of the arrangement. Head of the family lights the lamp (placed in front of the mirror) early in the morning and prays for well being of kith and kin. Children are woken up and brought to the mirror with their eyes closed. They are made to view the arrangement in the mirror and given Kani (money). More on Vishu here >> Link


Among the various goodies made for this festival, Tamil kitchens have Poli on their menu. While in conversation with my ma in law, I was talking about different fillings for a poli and told her about my love for carrot and coconut poli (among other variations). She said she would try this one out and tell me. The perfectionist that she is, not only did she make the Carrot Coconut poli, but promptly sent me pictures. For all her enthusiasm, how could I not document it on Avial and Rasam. As a rule I tend to make poli out of every possible vegetable and fruit (lol)... My ma in law used Maida (all purpose flour...I stick to whole wheat flour or atta)

All you need: for Ten 6 " polis
  1. Carrot (grated) - 1 cup
  2. Coconut (shredded)- 1 cup
  3. Jaggery - 1 cup (or to suit your taste)
  4. Elaichi - 3 (powdered)
  5. Flour (maida/all purpose) - 2 1/2 cup
  6. Haldi /turmeric - 1 pinch
  7. Ghee / oil - 1/4 cup
  8. salt- 1/4 tsp (or less)
  9. Water - 2 cups (or as required)


Process:
Puran: (the stuffing / filling)
  • Add salt and turmeric to the maida (or whoel wheat flour) and pour in a tbsp of oil, add sufficient water and knead it into a dough (not too firm). Keep it aside and let the dough rest for an hour or so.
  • soak jaggery in 1/2 cup of water and when it dissolves completely, sieve it through a filter (to remove sediments if any)
  • In a Kadai, pour in the filtered jaggery water and simmer for a minute
  • Add the cardamom powder, combine carrots and coconut and cook until the ingredients are cooked and the mixture is dry and done
  • When the stuffing is cool, divide them into ten parts  
For the poli
  • Divide your 10 dough into equal parts and roll each one out into a mini roti and place the filling on top
  • close the rolled out and stuffed  roti and use a little oil and press it down (with your fingers and the palm)
  • Roast it in a flat pan /tava apply oil or ghee(clarified butter) once both sides are done

Serving suggestion
serve with a cup of milk


Trivia
  • This makes a wonderful dessert and is made in most south Indian homes. 
  • A traditional Poli is stuffed with a mixture of split Chickpea and jaggery. There could be regional variations though.
  • What its called- Marathi - Puran Poli; Telugu- bobbattu; Tamil - Poli; Kannada - Obbatu
  • (Whatever the name, this dish tastes just as sweet!)
  • any vegetable which go into a parata works well in a poli...a little imagination and the possibilities are endless
Do try and let me know !!!!

    Friday, February 12, 2010

    Spicy Vegetable Cake

    I have been requesting family and friends to send in their favourite recipes, kitchen experiences and anything to do with their idea about food to be featured on the Guest Post segment of Avial N Rasam.

    My first two posts under the guest segment happened by chance and I loved the idea of contributions to the blog from people in my life. The first to respond to my request is my cousin Pallavi. She is a busy working mother of a cute two year old, and finds ways and means to incorporate vegetables into her little one's diet - (my 2 year old niece.) Here is the recipe she sent in...The recipe turned out so well and was over in no time...Picture credits : Pallavi


    Spicy Vegetable cake


    You need
    1 packet of Gits Dhokla mix
    1/2 cup of Sooji(Rava)
    1 1/2 Cups of Curd
    Spices:
    3 to 4 greenchillies
    2 Garlic Cloves
    3 inch Ginger
    1 tsp Coriander Powder
    1 tsp Cumin Powder
    Salt to taste
    Sesame seeds
    Ajwain
    Mustard seeds
    Oil
    Curry leaves
    Asafoetida
    Vegetables:
    Kasoori methi
    1/4 cup grated Carrot
    1/4 cup grated zucchini/Bottle gourd/Cucumber
    1 small grated potato
    Peas
    Corn
    1/4 cup grated cabbage
    • Procedure
    • Empty a packet of Gits Dhokla Mix in a bowl and add 1/2 cup sooji and
      curd to it and mix well. 
    • Allow it to sit for 1 hour.
    • In the meantime, grate the vegetables.
    • Boil the grated potato along with peas and corn for a minute in the microwave. 
    • Squeeze out the water from all the vegetables and add it to the dhokla mix. 
    • Crush Gralic &  ginger and add it to the mix. 
    • Add Coriander and Cumin Powder. Now add Kasuri Methi. Mix everything well. 
    • Take a baking sheet and pour the above mix into the baking sheet.
    • Sprinkle Sesame seeds on top of the mix poured in the baking sheet.
    • Heat Oil in a pan and add some mustard seeds, asafoetida and curry leaves.
    • When mustard seeds starts spluttering add it on top of sesame seeds.
      Preheat the oven at 380 F.
    • Place the baking sheets in the oven for 40 to 45 minutes. 
    • Enjoy with Coconut chutney or tomato sauce 
    •  
      It surely seems to be a yummy savory cake, and promises to be a wholesome veggie delight....I am going it try it this weekend....Do try it out in your kitchen and Let me know how it turned out....

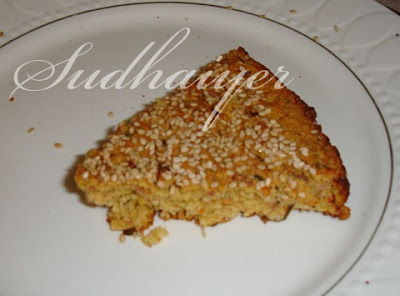
      Before you go...Here is a sumptuous slice


      PS: I would love to have a picture of your trial ...I plan to start a segment with reader's pictures and responses

      Monday, December 7, 2009

      Suran (Yam) Vatthal Kuzhambu

      Vatthal / Vathal kuzhambu means "kuzhambu" made of dried ingredient(s). "Vatthal" translates to sun dried in Tamil (with salt at times). This tamarind based gravy dish also has another variant called Vendhaya Kuzhambu (Methi seeds based kuzhambu). My ammama always made this kuzhambu variants in a stone pot called the kallu chatti/kal chatti. It is said that a stone pot adds a distinct flavour to any kuzhambu.


      Fresh and / or dried Vegetables which hold up to being cooked in a gravy are ideal for this dish. Other sun dried ingredients such as Manathakkaaali/marthangaalikai, sundakkai, sun dried cluster beans etc work well too. My amma makes vatthal kuzhambu with pappadam or appalam pieces and also just curry leaves.

      My ma-in-law's is known to make yummy vathhal kuzhambu and I consder this her "signature" dish.  (We have ardent fans of her vatthal kuzhambu at home). As a part of the guest blogger post spree, I thought I d flaunt her recipe. The perfectionist that she is, she went all the way out to click beautiful pictures with ingredients and then the finished dish for me in the kal chatti

      Traditionally, Tamil homes have a "maakallu chatti". "Kallu" means stone in Tamil, and chatti means pot. These pots are generally made of soap stone and need to be handled delicately.

      Here's her recipe...
      Ingredients : Serves 6
      Mustard----1 tea spoon,
      chana dal---1 tea spoon,
      Urad dal----1 tea spoon,
      Methi seed 1/2 tea spoon
      Red chilli 2
      Chilli powder --- 1 tea spoon
      salt --- 1 tea spoon
      Pinch of LG
      Groundnuts --- 1 table spoon
      Turmeric /haldi - 1 tsp
      Lemon size tamarind

      Jaggery - 1 tsp
      Oil - 2 table spoon oil
      Curry Leaves (10/11)
      Rice flour - 1 tsp
      Suran /Yam (can use any vegetable or vatthal of your choice)


      Procedure:
      •  Soak the tamarind in water for some time and then squeeze and take the essence of it about 2 glass quantity. Boil the vegetables and then add to the dish and boil for few minutes and finish the recipe (The vatthal kuzhambu can be prepared directly in the kalchatti. 
      • Take oil in the container, and  when oil is heated add mustard, chana dal, urud dal, methi seed, red chilli to it and fry.
      • Once the mustard crackles add chilli powder, pinch of hing powder, curry leaves Add the vegetables to it and cook {if the vegetables are cooked and ready add tamarind water essence along with it and boil} 
      • When vegetables are half done, add thick tamarind pulp, salt, to it and let it boil for some time 
      • After the vegetables are fully cooked, add the remaining tamarind water and boil. now mix rice flour with little water and add this to vatthal kuzhambu, and just keep it on flame for 2 minutes   
      • Finally add jaggery to it which will balance and add taste to the dish. 
      • You could also use Brinjal, Ladies finger, onions, sweet gourd, yellow pumpkin or chepengkazhangu The recipe is fairly simple. Try it! Before I leave..Here is the yummy vatthal kuzhambu made in kal chatti

      Friday, December 4, 2009

      Pudina Dhania Roti

      I requested my Usha Manni (Mami) to contribute to this blog. I am so glad she agreed..From now on you will see quite a few professionally written recipes, tips and much more (apart from my musings on food).

      I will be quoting my aunt here. Try her recipes and let me and her know how you did!

      She wrote...
      I must share what I tried this morning, for S's lunch box. As I had made cauliflower subji i had to make chappatis. thought of making poor S, my guinea pig & try out a new recipe. His luck ,it turned out well.

      Ingredients;
      atta -3 handful
      millet flour( ragi atta) - 1 handful
      salt - a pinch
      milk - 1 tbsp .
      mix all the ingredients.
      next grind together 10 to 12 leaves of mint( pudina)
      few stems of coriander
      a small piece of ginger
      1 green chilli
      1 tsp cumin seed
      add this to the atta & make a dough using hot water. once the dough is ready smear a
      tsp of oil on it. & roll out chappatis .
      so the pudina- dhania chappatis are there for u to try out.


      I have to tell you, she is among those bubbly enthusiastic ever smiling people who can just get you out of gloom...God bless her and the family!...So until next time..happy cooking!

      LinkWithin

      Related Posts with Thumbnails