Search A n R

Showing posts with label veggie delights. Show all posts

Friday, May 27, 2016

Green /Raw Papaya and chickpeas kabuli chana) in a mixed spice and tomato gravy

A pleasant person with a very charming personality came home for dinner last night. Had to make something yummy for her, Honestly, its very easy to cook for someone who appreciates variety and loves to experiment with food.

Made this gravy dish apart from the ever green mirchi ka saalan a carrot stir fry (recipe coming soon!) and my famous beetroot dhum / dum biryani :). 


The dish: 
Green papaya has been combined with pre soaked and pressure cooked chick peas to give a wonderful blend of juicy vegetable and a gluten free protein.

Serving suggestions: Can be served as is as a soup with a sour dough bread or simple roti/ phulka

Allergy info : Vegan, gluten free, Soy Free, mild spice, Low fat

Ingredients (serves 4 conservative) / 2 sumptuous :)

star ingredients
Green papaya - peeled and cubed - 1 1/2 cup
Chick peas (soaked over night and pressure cooked for two whistles) - 1 cup

boosters
tomatoes - 3 small
Onion - 1 large
Green chillies -2
red chilli -1

Flavour and spice

coriander seeds - 1 tsp
jeera - 1/2 tsp
Dry coconut / copra (grated) 3 tbsp
Khus Khus / poppy seeds - 1 tbsp
Til / ellu / Sesame seeds - 1 tbsp
elaichi  1
clove 1
cinnamon 1 cm strip
ginger - 1 cm
garlic 2 cloves
tamarind or kokam (pulp)1 tbsp
turmeric- 1/4 tsp
salt to taste

Water - to cook the papaya and chickpeas. and to grind the masala (2 cups)

garnish and temper
Curry leaves one string or 8-10 leaves
Coriander leaves  chopped 2 tbsp
Til or peanut oil - 1 tsp 
Mustard seeds  1/2 tsp
jeera - 1/4 tsp
bay leaf -1


Process: 

1 Boil the cubed papaya fro ten minutes or if its fresh, pressure cook it for a whistle
2 Pressure cook pre soaked chick peas with some salt and a little turmeric powder
3 Dry roast coriander seeds, jeera and other spices (Exclude turmeric, khus khus and tamarind pulp)
4 Set aside on a plate to cool
5 Soak khus khus in 3 tbsp of water
6 Grind the khus khus and then add the dry roasted spice mix and grind into a smooth paste
7 Transfer the mixture into a bowl and then in the same mixer jar, grind tomatoes, onion and chillies
8 Take a deep pan and add oil and when the oil is warm enough, add mustard seeds, bay leaf curry leaves and jeera
9 Once the tempering is fragrant, add the tomato onion, chilli puree and cook until its a half done,
10 Add the ground spice mix and add turmeric and tamarind pulp
11- cover and cook for five minutes on medium heat
12add the cooked papaya and chick peas,
13 add salt and half of the coriander leaves and cook well until done (chick peas and papaya should be sturdy and not mushy)

transfer into a bowl and garnish with the remaining coriander leaves

Done!!!!!


Do try my green papaya thoran recipe>> here 

Wednesday, February 15, 2012

Vegan Avocado Chocolate and raisin cake

I took out the avocado to make some Guacamole for dinner and guess what it ended up as - An eggless, low fat and dairy free Dark chocolate Avocado and raisin cake. I was never able to click a pic of this cake earlier. This time around, I had to document it :). It is whole wheat as usual...So here we go!

You need: for a small loaf or a 1" high 8" round cake

  • Whole wheat flour - 1 1/2 cup
  • Unsweetened cocoa powder - 3 1/2 tbsps
  • Baking powder - 1 tsp
  • Baking soda - 1 tsp
  • Sugar (I used turbinado) - 1 cup or lesser
  • Oil (sunflower or olive) - 1/8 cup  or 2 1/2 tbsps
  • Avocado - 1 small or medium - mashed well
  • Water - 2 cups  (if you use all purpose flour - it may require 1- 1 1/2 cup)
  • Lemon or White Vinegar - 1 tsp
  • Vanilla extract - 1 tsp
  • Raisins - 1/4 cup
Procedure 
  1. Combine all the ingredients and fold in the mashed avocado to make a smooth batter. 
  2. You can use a loaf pan or a round tray for this.  Grease and sprinkle some flour and pour in the batter
  3. Bake in the middle rack at 350 degrees F for 35-40 minutes (Make sure to check after 20 minutes of baking)
  4. Do the fork/knife test and if it comes out clean..you are done!

I left the cake to form a neat crust...you could take it out when the top layer is still moist :)


Grab a slice with your cup of tea..have a lovely evening :)

PS: Still to get the whole wheat pastry flour..but managing with the whole wheat from kroger as of now
Whole wheat makes the cake a little denser than the all purpose (maida) version
You can reduce the amount of choclate in the recipe

Saturday, December 18, 2010

Raagi Lauki Kofta - Low fat and healthy!

A small twist to usual lauki kofta. I prefer using raagi (millet) flour instead of chickpea flour (besan). Baking the rolls instead of frying them is the low fat twist to an otherwise oil consuming recipe. to be honest, no sabzi is special in my kitchen, that is because, our menu looks like a buffet list everyday. (I am sure hubby would appreciate this dish more if i gave him a rasam, saambhaar or dal n curry routine everyday!)

This recipe packs wholesome goodness of bottle gourd and millet and is a crowd pleaser.

How about a picture tour !
Lauki and raagi mixed with spices (salt, turmeric powder, ginger, chillies and garam masala powder) - rolled and ready for baking.


Drizzle some oil (olive or any other cooking oil) and bake at 375 for 30 minutes (use the middle rack and roll them over after 15 minutes. The final five minutes, put the tray on the top rack for a crisp exterior)

let them cool
( raagi gives the kofta a deep choclate colour and a faint sweet flavour - so you may want to tone up the spice levels)


Work on the gravy - (onion, tomato, poppy seeds, dry coconut, almonds. peanuts, ginger, garlic, cloves, cardamom, coriander seeds, cumin and cinammon stick (tiny 1 cm piece)- ground together) and sauted in a tsp of oil and a bay leaf


drop in the kofta when gravy is well done. and pour in a tbsp of curd /cream (optional). Simmer for a minute and you are done.


serve with rice or parata. Works with a whole wheat bread slice as well!

PS:
you may fry the kofta, i bake them for a low fat version
raagi makes the kofta a little dense, adding 1/2 tsp of baking or cooking soda (for 1 1/2 cup of raagi) may help ( i dont add it though)
adding a spoon of sugar to the gravy seems to appeal to kids. (gives it a ketchuppy flavour i guess)


Tuesday, November 16, 2010

Green apple and Gourd seeds chutney (thuvayal)

I grew up seeing my amma make use of every possible part of a vegetable.And I follow suit. I wrote about snake gourd seeds Thuvayal / chutney. >>Here. I generally come up with thuvayal on the spur, but never write down any recipe. I am used to going blank when someone asks me for a recipe...believe me I just cannot get down to writing down stuff (snob!...so excuse me that I am just putting up the picture of sauted ingredients. :P)..I forgot to click a picture after the grinding...lol...

Pic: shutterstock.com


All you need : to serve 2 (generously)
Green Apple (I used granny smith)..- 1 (big one!)
Snake gourd seeds - 1 cup
tamarind - (pulp)- 1 tsp or say the size of a marble (or lesser)
salt, turmeric, asafeotida
cumin - 1/4 tsp
mustard seeds- 1/4tsp
urad dal - 1/4 tsp
chana dal - 1/4 tsp
curry leaves - 4
corainder /cilantro - 1/4 cup
red chilli- 1
coriander seeds - 1 tsp
oil - 1/2tsp

process:
Temper mustard seeds, cumin, dals, red chilli, curry leaves and coriander seeds
Add snake gourd seeds and apple (cubed)
salt, turmeric powder, asafoetida/hing and saute until the seeds loose their raw smell
add cilantro/coriander leaves and leave it covered for a minute
take it off the stove and cool before grinding. Add the tamarind pulp or the soaked tamarind while you grind the thuvayal

Easy isnt it!

PS:
Tried a variant - gauva (jamakaya) as well and I loved that chutney too.
I use these chutneyz as my salad dressing...they lend a sweet and tangy flavour..yum!

Monday, November 1, 2010

Stuffed Bittergourd (Karela)

I love Karela (bitter gourd) and this time around, I wanted to write down the recipe I learnt from a Bengali neighbour while living in Pune. The basic stuffing is made of poppy and mustard seeds. This lends a distinct heat to the vegetable and even helps reduce the bitter taste I guess (who knows, I cant tell..lol). I make it often but I never thought of writing it down. A few ingredients lacking most of the time though. This post has been in a draft state for ever..i have been too tied up with things in life to have been blogging :)..better late than never is what works apt here!!..so here we go

All you need (Serves 2)
Karela - 3 or 4
Mustard seeds (black variety) - 1 tbsp
Poppy Seeds - 1 tbsp
Red chillies- 2 (adjust the chillies to suit your need - mustard seeds lend their heat)
Turmeric powder - a pinch
Salt to taste
A special tempering mix (very Bengali)- Panch Phoron - 1 tsp
(Fenugreek (মেথি methi), Nigella seed (কালো জিরা kalo jiraCumin seed (জিরা jira), Radhuni (রাধুনি radhuni), Fennel seed (সঁওফ sőf or মৌরি mouri) )source- wiki
til or an cooking Oil - 1 tsp


process (I'll let the pics do the talking!!)
Grind a mixture of poppy seeds, red chillies, turmeric powder 
slit open small karelas and salted them and left them for ten minutes ( adding salt sweats a vegetable so be ready to give the karelas a light wash and then gently drain the excess water out)
stuff the karela with the poppy seeds paste 


 cook them (in a plate) in a microwave for five minutes

put in the tempering ingredients in a  the pan/kadai put in pre cooked karela and cook until done (cook it in as little oil as possible...I sprinkle in some water to cook it better...its a misconception that more oil means more flavour!)


After the cooking and roasting is done. Take the karela out to serve with steamed rice or roti.

PS: i love to eat it as is!! cant help my love for the veggie!

I do not claim (bengali) authenticity of the dish ..it is something i learnt by seeing aunty (K's mom) make it..never got the chance it write it down...any suggestions pleasantly welcome!!

Sunday, August 29, 2010

Whole Wheat Pizza - all home made :-)

Yes guys, this has been made from scratch. I am trying to use up my stock of yeast. hence the bread making and pizza making spree for the last few weeks. This was not the first pizza I made, however, lazy me!...I couldnt get to post pictures on the blog!!

I love home made stuff cos I can add a truck load of veggies to the dish and make it as yummy as I can...lol..(what else do u expect from a foodie.). The dough is made from scratch at home. And keeping in tune with my promise to be as sustainable as I could, I bough locally grown vegetables and cheese for the topping. It turned out yum!!

How its made?
Pizza base
Whole wheat flour - 2 1/4 cup
active dry yeast - 1 tbsp
milk or water to activate the yeast - 3/4
honey - 1tsp
salt- a pinch
herbs (optional)- 1 tsp (includes - oregano, basil and curry leaves (it lends a south indian flavour to the dough..but it works for me!!)
olive oil (extra virgin) - 1 tbsp

Sauce- I follow a recipe I learnt from a chef friend..it is the yummiest!
Tomatoes (Chopped) - 3/4 cup
Onion (pref red- chopped) - 1/2 cup
garlic - 1 clove
dry red chillies - 2
dry herbs - basil, dill and oregano - 1 tsp (all together)
salt to taste
olive oil - 1 tsp
turmeric powder - a pinch (optional) but works well!
Brown sugar or honey - 1 tsp (flavour enhancer) (optional)
Cilantro leaves - chopped - 1 tbsp
Parmesan cheese (grated) - 2 tbsp
almonds (roasted) (optional) - 5

Toppings (just go crazy!!)
Capsicum / bell peppers - 1/4 cup
Red and yellow bell peppers / capsicum - 1/4 cup
Onion (pref red) (i had white ones)- (long slices) - 1/4 cup
tomato - (long slices) - 1/4 cup
olives - 10 (green pr black) (chopped)
Jalapeños - 1/2 (cut into rings :)

Cheese
Mozzarella - 1 cup or lesser (grated)
Fontina (optional) - 1/4 cup (grated)
Parmesan - 1 tbsp

Process
The base

  • In a cup of warm water/milk (should be luke warm not hot! ), put in yeast and honey and mix well.  Leave for around 5 minutes for the yeast to get active...you will know it is done when you see it all frothy
  • In a bowl, mix the wheat flour, salt, and olive oil and create a small well in between!!fun isnt it!...pour in the yeast mixture and fold in the flour mix slowly.
  • I do not have a machine/kneader so I use my hands to gently knead the flour for about 5 to 8 minutes
  • Once you are done kneading, cover the bowl with a moist cloth and put in a warm and dry place to let the yeast do its work.
  • An hour later, you will find the dough risen and double its initial volume
  • Punch it down lightly and let it sit for another 45 minutes
  •  And then lay it out on a lightly floured surface and gently punch it with your palm...into the shape of your choice while assembling the pizza...(it need not necessarily be round!!)
  • Moving on to the next step - the sauce 
The Sauce
Take a tsp of extra virgin olive oil in a pan, saute chopped garlic and add chopped onions
Snip red chillies and add it along with salt, and dry herbs.
Saute for a whole minute and add in chopped tomato(es)
When the tomatoes look half done, add sugar, turmeric(optional),almonds and cilantro/coriander leaves
saute for a minute and take it off the stove and let it cool, shower the mix with parmesan cheese
Grind and you have the yummiest pasta/pizza sauce ready


The Assembly

  • Take the pizza dough out and drizzle a little flour on the rolling surface (kitchen platform in my case)
  • use a rolling pin or your hand and roll out the pizza base (be gentle)
  • Shift the base on to the tray or the sheet you plan to bake it on (I use my cookie trays)
  • And now start arranging the veggie goodness - 
  • spread the pizza sauce evenly, making sure you leave an inch off the edge
  • lay out the veggies in the order you love, (you could alternate them based on colour...fun project with your kids? maybe!)
  • Finally, arrange the cheese and give a final drizzle of olive oil (a little pepper and oregano would be good as well)


Cook it!
Preheat the oven at 375F and put in the pizza tray and bake for 25- 20 minutes
(lower temperatures will leave the crust soggy and higher temp will burn the toppings so be sure of your oven before you expect a well done pizza- All ovens arent created the same, hence the tip)


Ok enough of talking...lets dig in....care for a slice?

And a few snippets before I leave....
  1. Using whole wheat flour makes the crust a bit denser than the maida/allpurpose /unbleached flour crust, so you could choose to put in equal portions of whole wheat and maida flour
  2. Try stretching the base as much as you can if you use whole wheat, but make sure you dont puncture the dough (to avoid a flat pizza :-)
  3. Always layer the vegetables over the cheese so that they grill well and the cheese melts over the crust and as the crust rises, vegetables embed themselves into the cheese layer...YUM!


Wednesday, June 23, 2010

Dum aaloo

I made dum aaloo sometime back and instead of posting my version, I wanted my friend Pooja to submit her recipe for a guest post. She obliged and sent me a picture and the recipe.


Dum Aloo recipe

18-20 small-sized potatoes
Oil to deep fry
½ tspn red chili powder
2 cups of yogurt
1 tspn coriander powder
1 tspn of dry ginger powder
1 tblspn of fennel powder
5-6 cloves
Salt to taste
tspn of roasted cumin powder
tspn of garam masala powder


Recipe
  • Boil the potatoes ( pressure cook -1 whistle )
  • Peel and prick the  boiled potatoes all over with the help of a fork. Heat oil in a kadai and fry the potatoes on medium flame till golden brown.
  • Whisk the yogurt with red chill powder ,salt, coriander powder, garam masala powder , dry ginger powder and fennel powder.
  • Heat 2-3 tbspn oil in a pan.
  • Add clove , half a cup of water and bring to a boil
  • Stir in the yogurt mixture and bring it to a boil
  • Add fried potatoes and cook till the potatoes absorb all the gravy and oil floats on top
  • Garnished with freshly roasted cumin powder(optional).

Serve with roti, parata or a bowl of steamed rice/jeera rice

Thursday, May 27, 2010

Summer time special - Vegetables on a skewer, BBQ style!

Summer is in and I feel like I am running out of ideas to keep my dinners appealing and appetizing. This has been a long pending promise to my hubby, a veggie bbq for dinner! I couldnt get to do the post immediately. Better late than never..right :).

All you need : serves 4
Capsicum / bell peppers : 3 (large) (Red, yellow and green)
Onion - 1
Tomatoes- 2
Pear - 1 (could use a green apple- optional)
cheddar cheese - 10 cubes (I cubed a store bought cheddar block)
Cucumber - 3 (smaller English / Indian variety)
Bamboo or metal skewers

for the sauce:
Salt to taste
Turmeric powder - a pinch
Kuzhambu powder - 2 tsp
olive oil - 2 tsps
Garam masala (All indian spices powder ) - 1/2tsp
Lemon juice - 2tbsps
Water - 2 tbsps


Process: 
Mix all the ingredients for the sauce and blend well
Soak the skewers in water for a few minutes
Wash and cube the vegetables
Coat the vegetables, all separately and keep them aside in different plates
Make sure to dip in tomatoes as the last ones.
Arrange them on to a skewer and onto a baking tray
Pour put them in a sequence to make a colourful line up
Place a few cubes of cheese over the veggies for them to melt over them
Bake at 375 F for 40 minutes (make sure to use the pre heat time as well)
Serve with a side of (rest of the ) cheese cubes and a cup of whipped yogurt or curd (optional)

Saturday, May 8, 2010

Summer Salad - Vegetables in flavoured curd

Summers  need an extra bit of that cooling via food and drinks. Why not try out a refreshing yet simple salad for a sunday afternoon lunch. Salad recipes are the simplest and the only time you spend is chopping the vegetables.

All you need
sweet red and yellow peppers - 5
white onions - 1 small
tomatoes - 2 small
Lettuce leaves (Iceberg) - five huge leaves/layers
Olives - 1/4 cup

For the dressing
Curd /Yoghurt - 1 cup
Lemon juice - 1 tbsp
Puli inji - 1 tsp
Olive oil - 1 tsp
Dried herbs (rosemary, oregano, basil) - a pinch each
Salt
Pepper powder - 1/2 tsp
Cumin powder - 1/2 tsp
Cilantro / coriander leaves for garnish

Process:
Chop up the vegetables and wash them thorougly. Tear up the leaves into tiny bits and make sure not to chop lettuce with a knife.

Whip up the curd, add all the dressing ingredients and mix well.
Add all the vegetables and mix well
Put the bowl of salad in the refrigerator if you like a cold salad (optional)
Yummy!

Monday, March 22, 2010

Lettuce and Matki sprouts Dal /Soup

Greens are great for your digestive track as they bring in fiber into your diet. A good digestive system ensures smooth running of your other systems and that mean over all health! Salad, soups and grilled forms of leafy vegetables should be made a part of your everyday meal. However, it is important to check for allergy information before you choose your greens. For example, people with Thyroid malfunction are asked to minimize use of a few vegetables, such as cabbage, cauliflower, soyabeans or soya products (as these food varieties contain goitrogens and do not allow absorption of Iodine by the body.)

Lettuce is among the common greens used in salads. I recommend that you try at least one variety of lettuce in your diet if they are available in your local market. Here is a nice article on Lettuce varieties for you to know more about this leafy veggie. HERE . If you are bored of eating raw lettuce in your salads and sandwiches, this simple soup/dal recipe is a nice way to eat your lettuce. It is very easy to make and is great on a cold night.
leafy veggie - Red leaf Romaine lettuce
Moth dal (gujrati) or matki dal (Marathi) - Raw
Matki /moth dal (sprouts) and other lentil varieties feature prominently in Gujarati and Marathi cuisines
For this recipe:
Soak matki in water for at least 8 hours and drain it completely 
Tie it in a neat kitchen towel and leave it for a day for the matki to sprout
you could also use the soaked matki for this soup/dal 

All you need: serves 4
Matki sprouts - 1 1/2 cup (use 1 and  cup raw matki for 1 1/2 cups sprouts)
Romaine lettuce (a bunch) - 3 cups when chopped
Onion- (chopped) - 1/2 cup
spices: to grind
cumin seeds 1 tsp
Green chillies- 2
curry leaves - 5/6
mustard seeds (black) - 1 tsp
ginger - 1" piece- grated
garlic- 1 clove (optional)

Spices
turmeric powder - a pinch
kuzhambu powder - 2 tsps
Indian Garam masala - 1/2 tsp
Salt
Asafoetida -  a pinch
Bay leaf - 1 (fresh or dry)
oil - 1 tsp

Clove - 1
cilantro/coriander leaves for garnish

Method
  • Pressure cook matki / moth sprouts (a single whistle)
  • Grind mustard seeds, cumin, chillies, garlic, ginger, curry leaves and  half the quantity of onions into a smooth paste
  • In a kadai,  pour oil and put the clove and bay leaf and remaining onions and saute well
  • Add the chopped lettuce leaves and keep stirring until the lettuce is half done
  • Add the pressure cooked matki /moth sprouts and stir well
  • Pour the spice paste and salt, turmeric powder, asafoetida, kuzhambu powder and cook until done.
  • Add garam masala powder (optional) and simmer for another minute
  • Serve this soup with bread/roti or steamed rice


you could add some water while cooking to make the dish a little more soupy.


Trivia: ayurveda
Mustard and cumin paste helps in keeping your body warm in the winters
Asafoetida and garlic help in digesting the lentil better and reduces gas in your stomach
Lentils /whole dals (not kellogs lol...) are easy to cook and digest when they are soaked allowed to sprout

Thursday, March 18, 2010

Hyderabadi Mirchi Ka Saalan - An ode to Chillies

Coming from the city of Hyderabad, it is natural that I love hyderabadi food (vegetarian). I am sure most of us would have heard about the famous Hyderabadi Biryani. Infact,  biryani, mirchi ka saalan and bagaara baingan are a staple in most hyderabadi wedding menus and served along with rasam, saambaar, pappu and gongura pacchadi. (slurp!)

I was watching an episode of - The Best Thing I Ever Ate on the food network. I liked it when Ted Allen, an Emmy winning food writer, host and reviewer, mentioned Mirchi Ka Saalan as his favourite dish under Spicy category. And that reminded of this long pending draft and I sat down to finish the post. This is among several pending/scheduled posts for the blog. :).

Etymology and more...
As the name suggests, Mirchi Ka Saalan - translates to Chillies in a spicy gravy. This dish is truly an ode to the Chilli/pepper because, most recipes only use chillies as a spice and a flavouring agent. This dish has chillies as the main ingredient. Every authentic Hyderabadi restaurant serves Biryani with a bowl of Mirchi ka Saalan and Spiced raitha. Yummm!

Most Hyderabadi dishes are a nice blend of two very unique and wonderful cuisines - The Nawabi food/recipes adapted to the Andhra (local) ingredients. For example, among few other spices, addition of tamarind pulp, peanuts/groundnuts and red chillies to a typical nawabi masala gravy is the southern touch I am talking about. This blended cuisine is also called - Dakkani or Deccani khana.(derived from - Deccan plateau). Although Deccan plateau spans across south central India, Deccan food is more of a Hyderabadi/Nawabi speciality. (May be because Hyderabad was the capital city of the Hyderabad Sultanate and Qutub Shahi Dynasty)

Deccani food includes subtle variations from vidarbha and north eastern Karnatka (Bidar and Berar). Whatever the name, Hyderabadi food is simply wonderful. Also check out my adaption of locally available vegetables into Bagaara Baingan's gravy - Bagaara Celery and Pumpkin (mathan)

The recipe...
There could be small variations to this dish made in different kitchens. We generally use mirchi (the ones used for bhajji - Banana peppers) for this recipe. I used Serrano peppers. Any variety of Green chilli/pepper which could hold up in a gravy works well in this recipe. Types of chillies/peppers which could work for this recipe- Sweet Bell peppers (Capsicum), Poblano peppersMy version of the Mirchi Ka Saalan requires very less oil, preferably olive oil.


You need: Serves 4

Banana pepper or Serrano peppers - 9-10

Spices for the gravy
Coriander seeds - 2-3 tsps
Cumin seeds- 1 tsp
Coconut - 4 tbsp (dry or fresh) (grated)
Tamarind (pulp or paste) - 2 tbsp
Ginger - 1 " piece
Garlic- 2 or 3 cloves
Red chillies - 2
Sesame seeds (til or ellu) - 1 tsp (optional)
Groundnuts (roasted) - 4 tbsp or a count of 15 - 20
cloves 2 or 3
cinnamon 1 cm strip
elaichi 1 (optional)
bay leaf 1
Curry leaves - 6 -8
Poppy seeds (Khus Khus) - 2 tsp
Onion (chopped) - 1/2 cup
Salt to taste
turmeric powder - 1 pinch
Asafoetida - 1 pinch
oil - 1 tsp

Cilantro /coriander leaves for garnish

Process
  • Slit open the chillies/peppers and scoop out the seeds and soak them in salted water (helps in reducing heat)
  • Soak Poppy seeds in just enough water and leave it for a while
  • Dry Roast coconut for half a minute or so and take care not to turn it brown. Transfer it to a plate and let it cool.
  • In the same Pan/kadai roast corainder seeds, cumin, split chickpeas / chana dal, red chillies and onion along with cloves, dalchini (cinnamon) and elaichi
  • Roast sesame seeds separately (they splatter so keep the flame low)
  • Fine grind the sesame seeds and then add the rest of the roasted spices, ginger, garlic, coconut, curry leaves, tamarind pulp and prepare a smooth paste.
  • Grind the soaked poppy seeds (separately) into a smooth paste (poppy seeds tend to remain coarse if ground along with other spices)
  • Drain the chillies (from the salted water) and use clean kitchen towel to pat them dry
  • Pour 1 tsp oil in a kadai/wok/pan and saute chillies
 Pour in the ground masala into the kadai
Add salt, turmeric powder and hing(asafoetida) and cook until the chillies look done and masala looses raw smell

Garnish with cilantro/corainder leaves and serve with Biryani /flavoured rice or simple steamed rice
Try this Hyderabadi classic and do let me know if you liked it...until next time take care!

Trivia:
  • Did you know that chilli/peppers used as flavouring agents and a spice, are basically classified as berries 
  • A simple ground rule to choosing chillies, the smaller the chilli, the hotter it is!
  • Here is a brief guide to choosing your chilli based on the intensity of heat: HERE - chillipeppermadness.
  • (Chillies is the spice and not the Chilli recipe famous in the Americas.) 

Friday, February 12, 2010

Spicy Vegetable Cake

I have been requesting family and friends to send in their favourite recipes, kitchen experiences and anything to do with their idea about food to be featured on the Guest Post segment of Avial N Rasam.

My first two posts under the guest segment happened by chance and I loved the idea of contributions to the blog from people in my life. The first to respond to my request is my cousin Pallavi. She is a busy working mother of a cute two year old, and finds ways and means to incorporate vegetables into her little one's diet - (my 2 year old niece.) Here is the recipe she sent in...The recipe turned out so well and was over in no time...Picture credits : Pallavi


Spicy Vegetable cake


You need
1 packet of Gits Dhokla mix
1/2 cup of Sooji(Rava)
1 1/2 Cups of Curd
Spices:
3 to 4 greenchillies
2 Garlic Cloves
3 inch Ginger
1 tsp Coriander Powder
1 tsp Cumin Powder
Salt to taste
Sesame seeds
Ajwain
Mustard seeds
Oil
Curry leaves
Asafoetida
Vegetables:
Kasoori methi
1/4 cup grated Carrot
1/4 cup grated zucchini/Bottle gourd/Cucumber
1 small grated potato
Peas
Corn
1/4 cup grated cabbage
  • Procedure
  • Empty a packet of Gits Dhokla Mix in a bowl and add 1/2 cup sooji and
    curd to it and mix well. 
  • Allow it to sit for 1 hour.
  • In the meantime, grate the vegetables.
  • Boil the grated potato along with peas and corn for a minute in the microwave. 
  • Squeeze out the water from all the vegetables and add it to the dhokla mix. 
  • Crush Gralic &  ginger and add it to the mix. 
  • Add Coriander and Cumin Powder. Now add Kasuri Methi. Mix everything well. 
  • Take a baking sheet and pour the above mix into the baking sheet.
  • Sprinkle Sesame seeds on top of the mix poured in the baking sheet.
  • Heat Oil in a pan and add some mustard seeds, asafoetida and curry leaves.
  • When mustard seeds starts spluttering add it on top of sesame seeds.
    Preheat the oven at 380 F.
  • Place the baking sheets in the oven for 40 to 45 minutes. 
  • Enjoy with Coconut chutney or tomato sauce 
  •  
    It surely seems to be a yummy savory cake, and promises to be a wholesome veggie delight....I am going it try it this weekend....Do try it out in your kitchen and Let me know how it turned out....

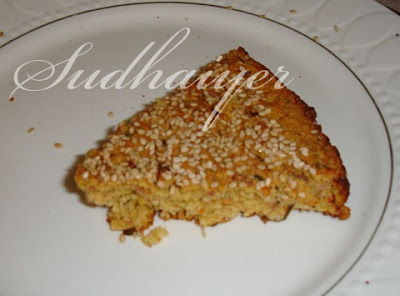
    Before you go...Here is a sumptuous slice


    PS: I would love to have a picture of your trial ...I plan to start a segment with reader's pictures and responses

    Penne and Veggie Casserole

    This recipe serves 4 and makes a yummy leftover food too.. :) .. I learnt this from a Greek TV show while in Cyrpus...I knew very little Greek so had missed out on a few details while watching the show...I could make it a yummier version with special inputs from a very dear friend Padmaja....You could refer to my earlier post on types of pasta to understand this recipe better.


    All you need: For 4 
    1 Cup uncooked Penne
     1 Cup Fusilli
    Water to cook the pasta
    Salt (for the pasta and the vegetables)
    Extra Virgin Olive oil - 2 tsps

    Vegetables: 
    Capsicum /bell peppers (red, yellow and green) - 1 cup
    French beans - chopped - 1 cup
    zucchini - chopped - 1 cup
    Onion - 1 (chopped)
    Garlic 3-4 cloves


    Herbs and spices:  (Fresh or dry)
    Oregeno, Rosemary, Basil - 1/2 tsp each
    Red chillies - flakes (dry roast and crush the red chillies) - 2
    Coriander leaves / Cilantro - for garnish
    Black Pepper powder - 1/2 tsp
    Nutmeg

    Process:
      • Boil water in a vessel, add salt and few drops of oil and add in your pasta (I used penne and fusilli)
      • Once the pasta is a little less than al-dante (say, half done :-) )... use a sieve and drain out the water and keep it aside. (so that the pasta does not become mushy when baked)
      • It is better not to run cold water on the cooked pasta as the starch helps in soaking up the sauce or any other flavour better
      • In the meanwhile, prepare your vegetables for the casserole
      • Microwave or blanch your vegetables for 4-5 minutes and keep it aside
      • Pour a tsp of oil into a wok/kadai/pan and put in the garlic and onions
      • Add salt, pepper powder, chilli flakes and the herbs and saute well
      • Add all the vegetables and saute for a minute or so
      • Grease a baking dish (preferably 8 x 8)
      • Spread the vegetables and the cooked pasta in alternate layers
      • Sprinkle shredded mozarella cheese and grate a little nutmeg over the dish
      • You could also add a layer of cheese between the vegetables and pasta (optional)
      • Cook in the oven at 300 F for 20 minutes
      • Take it out of the oven and garnish with the remaining cilantro/corainder leaves 

      Serve with a bowl of tomato soup...YUM!!


      Trivia:

      • You could use any short pasta of your choice for this dish. Please refer to my earlier post on>>check this link - Knowing your Pastas
      • I also make another version of this casserole with a hint of tomato sauce...more about it in my next post...
      • It would be good to add fresh herbs....but dried versions are equally good
      • Another way to work the the veggies is to oven roast them for 12-15 minutes on the top rack at 450F. 


      Tuesday, February 2, 2010

      Gongura Gobi - Cauliflower Stir fried with Gongura leaves

      I can never cook using measures and proportions, that is one of the main reasons why I hesitate to post recipes on my blog. My amma had sent me some sun dried gongura leaves for me to make the traditional Andhra Gingura Pachchadi (pickle). But I dint want to risk making a pickle in winter {Summers are the best for making pickles - lower humidity works well for the pickling process. :-) }.

      Fresh Gongura bunch


      Mix and match happens to be the in thing in my kitchen.I decided to use these yummy gongura leaves in a stir fry. Cauliflower and broccoli were the first choice because I remember my amma makes really yummy cauliflower and methi(fenugreek) leaves fry.

      Cauliflower is a rather bland vegetable with a distinct smell associated with it. We use it in gravy curries, stir fry it, add it to pulav, or stuff in a parata. It works wonderfully in any dish. I have seen people either love or just hate this vegetable. Coming to the dish this post is all about- Gongura being a naturally tangy leafy vegetable, works well with the versatile cauliflower. A few minutes in the kitchen and you will have a yummy, tangy spicy Cauliflower stir fried with gongura leaves. I mixed in a few florets of broccoli for that extra hint of nutrition.

      You need. (Serves 2)

      Cauliflower florets - 1 cup
      Broccoli florets- 1 cup
      Gongura leaves - 1 cup
      salt (to suit your taste)
      turmeric powder - a pinch
      coriander powder - 1tsp
      cumin powder - 1tsp
      curry leaves - 5/6
      Cilantro/coriander leaves - for garnish
      Tempering:
      oil - tsp
      Cumin seeds - 1/2tsp
      (Methi seeds) Fenugreek seeds - 1/4 tsp
      Red chillies -2
      Ginger - grated - 2tsps
      garlic- grated - 1tsp
      Process:
      • Separate broccoli and cauliflower florets (use your hands) and soak them in a bowl of salt and water- for about 5 minutes
      • wash the gongura leaves and lay them on a towel to dry (excess water on the leaves can make your gongura leaves mushy and soggy) - this takes about 5 minutes
      • Pat dry your leaves and chop them to suit your requirement
      • Pour oil in a kadai and saute the red chillies for a few seconds - take it out of the oil and keep it aside
      • Start your tempering in the same oil - Add Cumin seeds(jeera), curry leaves and ginger, garlic and fenugreek seeds (Methi seeds)
      • Add gongura leaves and saute for a minute
      • In the mean while, drain cauliflower and broccoi florets off the salt water they were soaking in and wash them with some fresh water.
      • Add them to the kadaai and gently fold in the leaves and florets together. 
      • Add salt, turmeric powder, coriander and cumin powder 
      • Sprinkle some water to the vegetables and cover the pan/kadaai 
      • Once the vegetables are done, cook it for a minute or so with out the lid
      • Crush the roasted red chillies and sprinkle over the vegetables and take it off the stove
      • Garnish it with curry leaves and serve with rice or roti 
      Trivia:
      • Gongura is a very rich source of Iron, vitamins, folic acid and anti-oxidants
      • Adding methi seeds to this dish helps in balancing the heat which gongura is said to generate once eaten. 
      • gongura is leaves turn mushy when washed because of its association with the hibiscus family.
      • Gongura comes in two varieties - Green stem and red stem. the red stem variety is tangier
      • Not only the telugu cuisine, but even tamil kitchens boast of a number of recipes which includes this leafy vegetable (Gongura is called pulichakeerai in tamil- which leiterally means (puliccha)- tangy (keerai) - leafy veggie)

        Wednesday, January 27, 2010

        Bisi Bele Huli anna / Bisi Bele Bhaath

        Need a brilliant one pot meal loaded with nutrition - think Bisi bele Bhaath (baath) / bisi bele huli anna. You could cook it in a rice cooker or a pressure cooker. This is a very versatile dish and could be made with any vegetable of your choice.

        Etymology: Bisi bele bhaath literally means hot dal and rice. My ammama tells me that adding vegetables must have happened eventually :-). Traditionally this dish must be the kannadiga version of the tamil Venn pongal (made from rice and moong dal). Bisi Bele bhaath uses Tur dal instead of moong. This Karnataka cuisine classic includes everything from the basic food groups
        - wholesome goodness of vegetables
        - protein from tur dal
        - Flavour and digestive properties of red chillies, tamarind pulp, salt, turmeric, khuzhambu powder, asafoetida (hing)
        - antiseptic properties of turmeric powder
        - Essential carbs from the brown rice (i prefer brown rice, you could use any rice of your choice)
        - Vital Vitamin A from curry leaves
        .. and lots more!


        The Recipe...
        You need: Serves 2
        Brown Rice- 1 cup
        Tur dal- 1 cup
        Tamarind pulp - 1/2 cup
        Khuzhambu powder - 1 tsp
        salt to taste
        turmeric powder - 1/4 tsp or lesser
        hing - a pinch
        curry leaves -5
        Vegetables of your choice
        (I used Red cabbage, carrots, beans, potato, Bengaluru kathrikkai (chow chow))
        oil (to saute' vegetables) - 1/2tsp
        Cilantro / corainder leaves for garnish

        Bisi bhelle Masala / powder (serves 2)

        Dry or Fresh Coconut (shredded) - 2tbsp
        Corainder seeds - 1/2 tsp
        Cumin seeds - 1/2tsp
        Chana dal - 1/2tsp
        Urad dal - 1/2tsp
        Rice - 1/4 tsp
        Red chillies - 2

        Tempering
        Mustard seeds - 1/2 tsp
        Ghee - 1/2tsp 
        jeera / cumin - 1/2  tsp
        Curry leaves - 5-6
        hing - a pinch
        red chillies - 2
        clove- 1 (optional)
        elaichi - 1 (optional)
        dalchini (cinammon) - small piece (optional)

        Process:
        • Wash tur dal and rice, dice vegetables and wash well and soak for a few minutes (Saves energy)
        • Dry  roast bisi belle masala ingredients and fine grind them into a powder
        • Saute vegetables in a tsp of oil and add salt, turmeric, khuzhambu powder, hing and curry leaves. 
        • Drain and mix in washed rice and tur dal and saute for a minute
        • Add the Bisi Bele masala powder and saute for half a minute
        • I like to add a few corainder leaves /cilantro  while the dish is cooking apart from using it for garnish
        • Add the tamarind pulp and pour enough water to cook the rice, dal and vegetables
        • you could add water to vary the consistency of your dish (you could cook it a bit put together or do it the traditional way which is a bit flowy )
        • pressure cook upto two whistles or in a rice cooker until done
        • Tempering : Add ghee in a kadai, mustard seeds, let it crackle
        • add (cumin) jeera, curry leaves and green and red chillies and saute 
        • Pour over the rice and serve with yummy raitha or mooru khuzhambu
        • Garnish with cilantro/corainder leaves. 

        Trivia
        • I skipped the tempering to avoid use of excess oil 
        • You could use dry coconut for the masala powder and refrigerate it for future use 
        • You use this powder to make your thoran /poriyal/ dry vegetable fries (a brinjal, potato fry with this powder tastes like heaven)


        PS: This is how my amma makes it so I follow the same recipe...There could be variation...do let me know of you prepare it differently!!

        Sunday, January 10, 2010

        Soba and other Japanese noodles ..YUM

        Among the innumerable things we cook at home...Soba was on the menu during the weekend. I had an array of colourful veggies in the refrigerator and had a pack of these yummy Japanese noodles.

        And, this yummy veggie delight had to happen.


        Not only the Chinese cuisine, but the Japanese cuisine boasts of a decent spread of noodle recipes and varieties. Every variety I know of is made of buck wheat dough.

        Know your noodle, the Japanese Style

        Japanese noodles come in four forms, Ramen, Shirataki, Soba, Somen, and Udon


        Ramen - The dough is kneaded with soda water to allow rising before the dough is pulled to form the noodle. Ramen is a thin noodle variety and is of Chinese origin. Ramen basically is a Japanese version (read corruption) of the name Chinese name"Jo mein" which translates to hand pulled noodles in Chinese. These noodles fluffy cos of the soda water and work well in soups. And this name has no connection to the brand Top Ramen...lol...

        Then Japanese market has a wide variety of Ramen noodles, depending on the geographic location and the  in Japan.


        Image source: z.about.com
        Ramen soups are categorized by flavors and are mainly of four kinds
        • shio ramen (salt flavored soup), 
        • shoyu ramen (soy sauce flavored soup),
        • tonkotsu ramen (pork bone soup),
        • miso ramen (miso flavored soup). 
        Regular Ramen toppings include leek, seasoned bamboo shoots, dried seaweed such as Kombu, grilled pork, boiled egg etc.

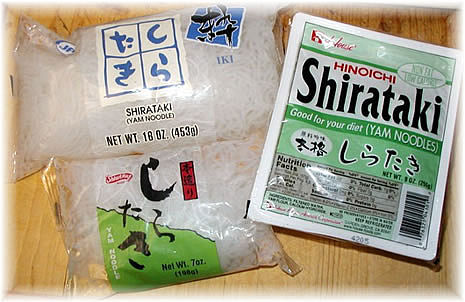
        Shirataki - noodles with very low carbohydrates and calories made from a plant called Konjac plant. These noodles, also called Yam noodles, is wet packed and ready for use out of the packet. These noodles are said to have no bad carbs and are said to be a good form of starch in your diet.


        Image source: oriental-marketplace.com
        I also remember seeing Tofu Shirataki noodle in the Asian market. And it is said that this noodle variety has been gaining popularity in the USA. These noodles are great in salads, soups, and even desserts!

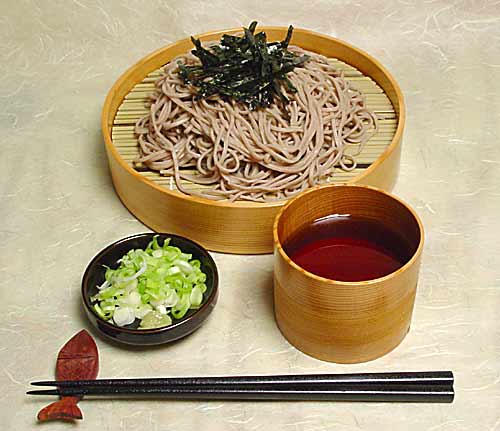
        Soba  - This is the noodle variety I bought home this time. They are  medium sized, buckwheat-based noodles with uses in cold and hot recipes. These noodles are inexpensive and have been found to be served on local food stalls and road side cafe houses. Soba is quite starchy and tends to absorb flavours well.Ypu could have guessed this by the creamy texture of the bowl of Soba I made.

        Image source: wiki
        We find two major varieties of this noodle,
        • Sarashina soba: thin, light-colored soba, made with refined buckwheat
        • Inaka soba: "country soba", thick soba made with whole buckwheat
        Types of dishes:
        Cold Soba is served with a dipping sauce and is a summer favourite.Hot Soba soups are served in a broth and topped with vegetable of choice.

        Image source:trekjapan.com

        There are various varieties of Soba noodles based on regional preferences.Another very interesting fact about Soba is that in most regions of Japan, it is eaten during festive occasions and particularly on the New year's eve. As such Japanese are known for their extensive hospitality and as part of this culture, people welcome their new neighbors by giving out soba. Soba, when compared to pasta or bread, also scores high on content of amino acid.

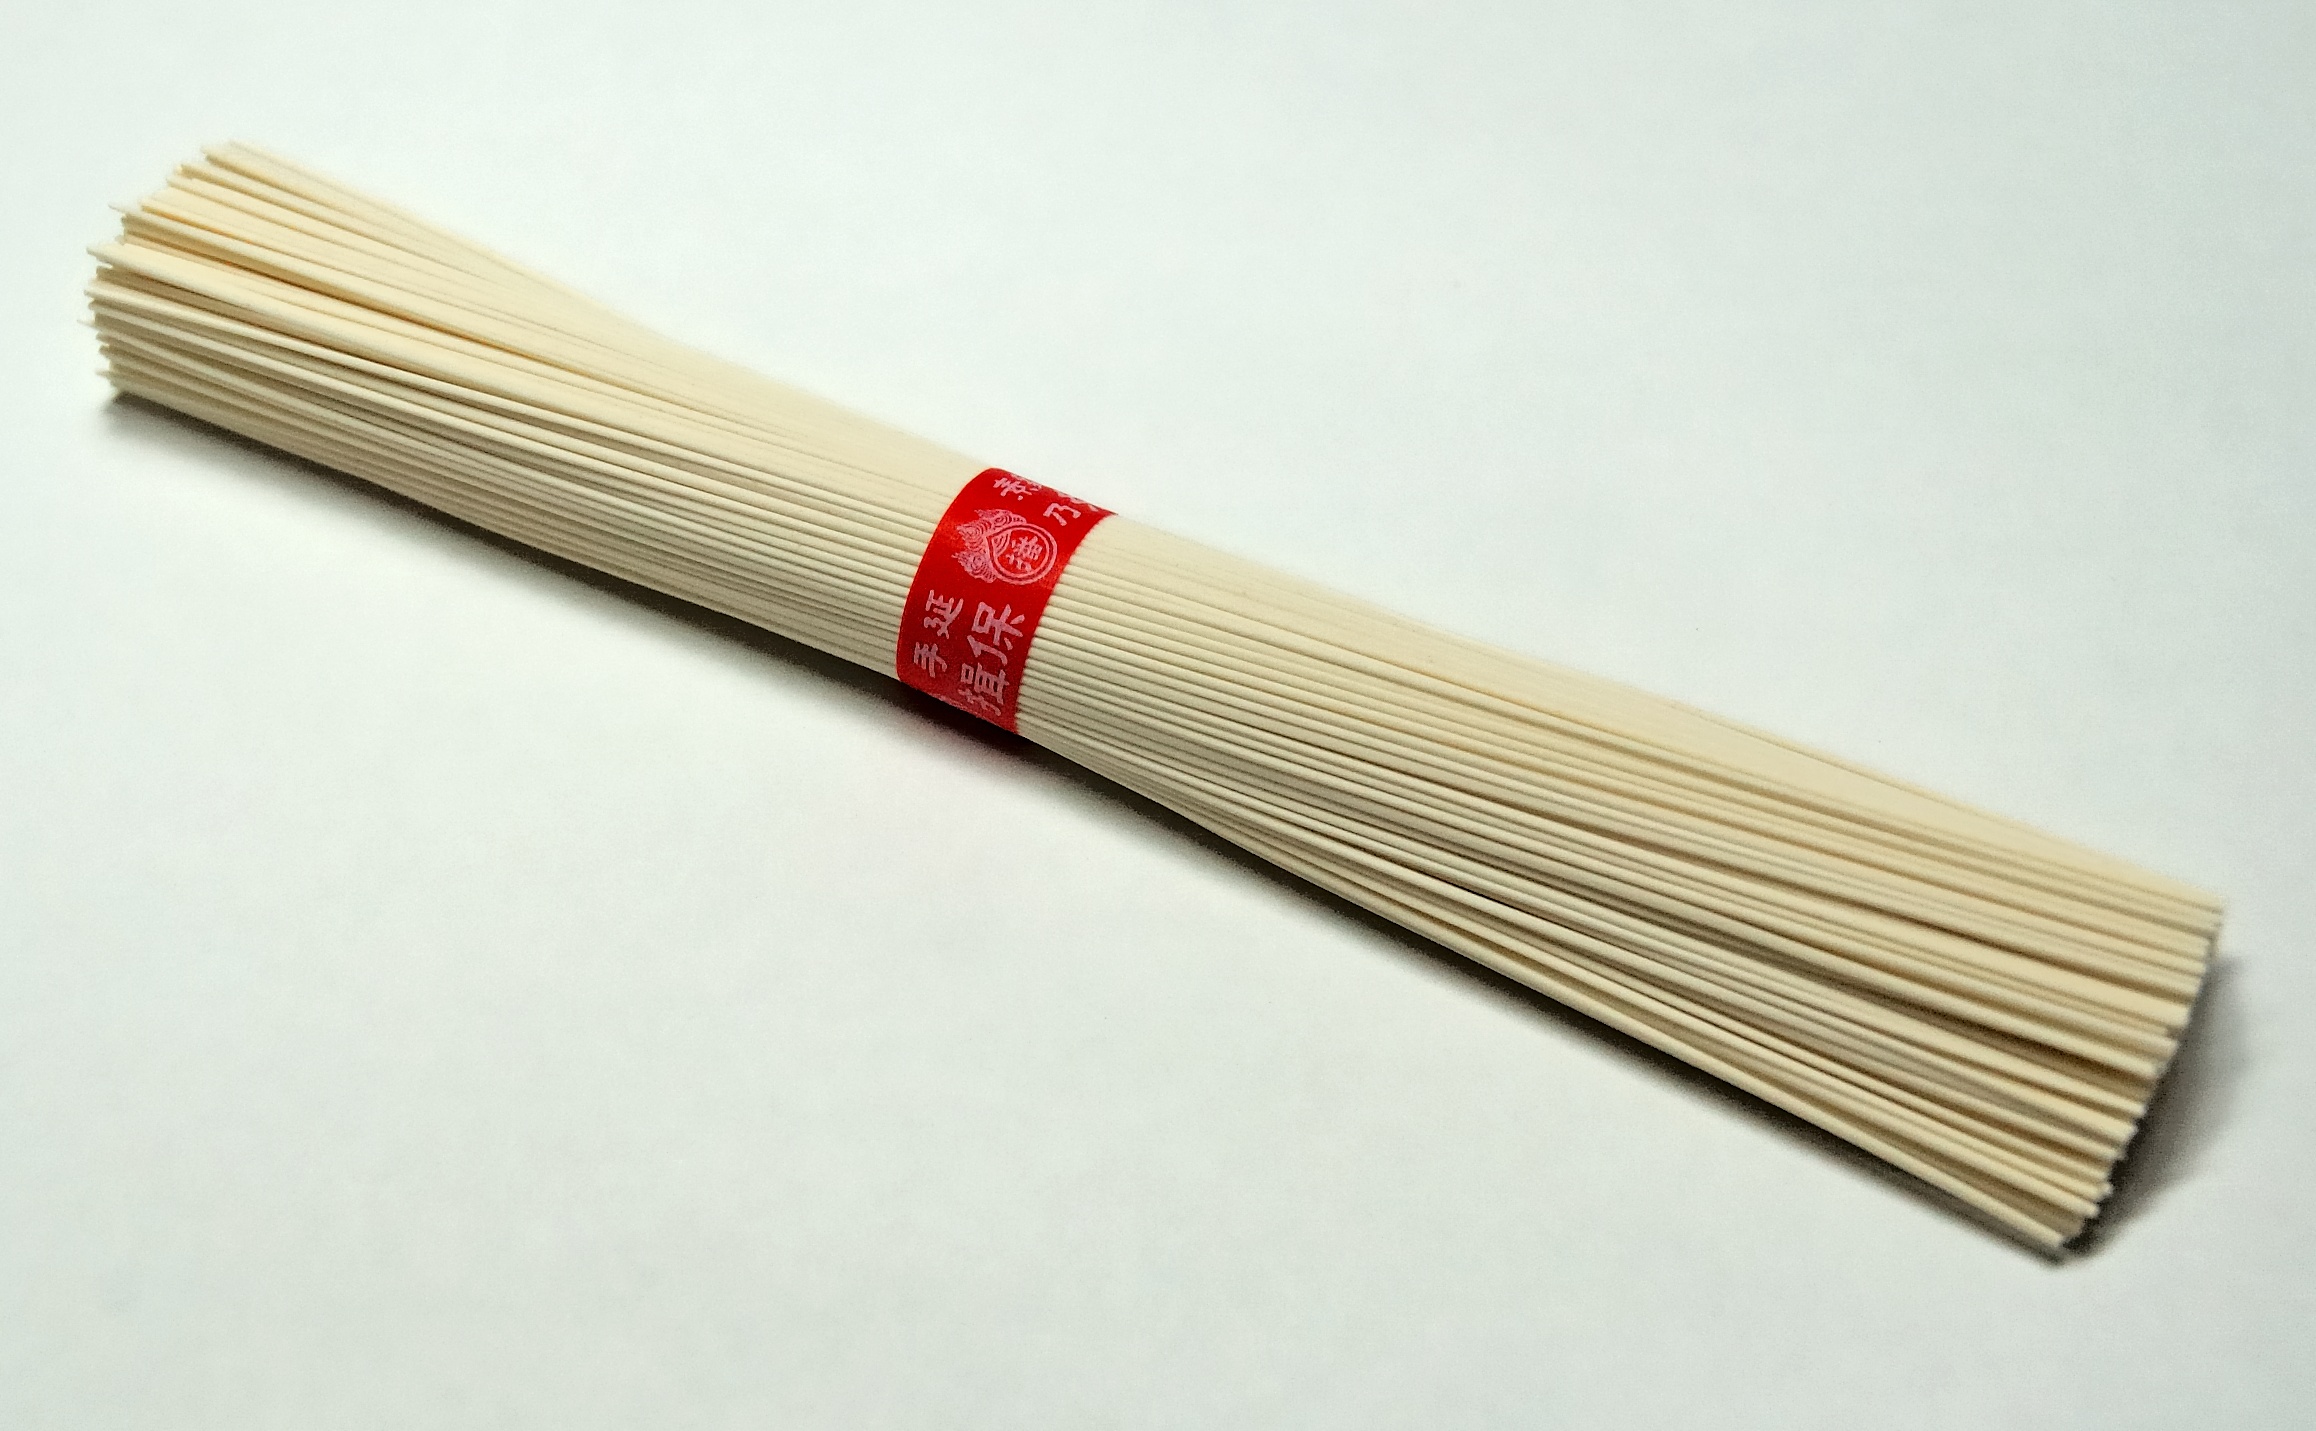
        Somen - very thin, wheat-based noodles served cold with mildly flavoured dipping sauce and toppings. Although, winter calls for hot somen dishes (quite similar to ramen and Soba noodles)

        Image source: wiki
        It is better to cook these noodles in high heat (boiling is done similar to other pasta/noodle). Somen noodles work well in salads and stir fry.


        Udon - thick, wheat-based noodles varitey which is hand rolled. It is best when served hot with dipping sauce and toppings. Cold serving recipes also exist for this noodle...the possibilities are endless!

        Image source: wiki

        Hmm...all this food talk has rats running in my tummy...let me enjoy this bowl of yummy Soba stir fried with red cabbage, red and yello bell peppers, onions and carrots. Tempered with ginger and green chillies and vinegar. Ah! divine.

        Thursday, January 7, 2010

        Plantain in mustard masala (dry) - aava pettina aratikaya

        This is one of those easy to cook recipes with a load of nutrition from plantains, and all the spices(mustard, cumin etc). I can gobble up any amount of thoran and fries before it reaches the dining table.

        Plantain, banana stem (vaazhai thandu), banana flower and (sweet) banana are feature regularly  in our diet. I am a total foodie, a health conscious one at that.... because my amma repeats the nutrition chart with every meal she serves...lol.

        Health facts

        Plantain, Banana and its stem are known to be effective in treating high blood pressure and Renal diseases (Kidney). There is a difference between the usual banana we eat as a fruit and the raw green plantain we cook. Although all of them are botanically the same, the difference is in the sugar levels in each variety.This is why plantain is considered better for people dealing with diabetes

        Banana Stem - Vaazhai thandu
        Image source: wiki
        Banana flower - Vaazhai poo
        Image source: wiki

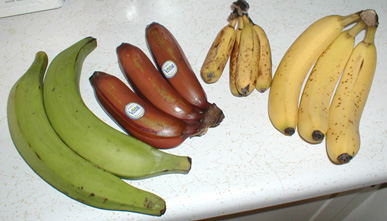
        Banana varieties - (L-R) Plantain, red banana (nendram pazham), small banana (malai pazham), regular banana
        image source: wiki
        I love raw banana in any form, in avial, kootu, fry or as simple plantain chips! yum...The recipe featuerd in this post is is one of the most common plantain fries I make at home. Nothing fancy about the dish, just that we need to fold in a masala paste into the regular plantain fry.


         Plantain in mustard masala

        What you need : serves 2
        Raw plantain - 2
        salt-to your taste
        hing (asafoetida)-pinch
        Turmeric powder-pinch
        Khuzhambu powder - 1/2 tsp
        curry leaves - 6-8
        coriander leaves /cilantro - finely chopped for garnish
        Water - 1/2cup
        oil - 1tsp (I prefer coconut oil)

        Masala
        Mustard seeds - 2tbsp
        Jeera/Cumin - 1tsp
        Methi seeds - 1/2tsp
        Green or red chillies -2
        Ginger - 1/4 " piece

        Process:
        • Slice the plantains into any shape you prefer - cubes/rounds/ 1" long pieces
        • Dry roast the masala ingredients and grind into a fine powder
        • Par boil sliced plantain in 1/2 cup water with salt, hing and turmeric in a covered container (saves energy)
        • Once the planatain seems to be al-dante (half done), add the paste and cook
        • Add oil and curry leaves to the cooking plantains and gently mix everything in and cook until the paste looses its raw smell
        • Garnish with cilantro/coriander leaves
        Yummy fry is ready to be served with rice or carb of your choice!

        Trivia
        • Andhra cuisine has a dish called Ava pettina aratikaya koora (avalu means mustard in telugu, aratikaya - raw banana)
        • Telugu and Bengali cuisines are known for their extensive use of mustard masala in their cooking.
        • Raw banana based recipes are common in South and East Indian, Sri lankan, Thai, Indonesian, Singapore and Malay cuisines

        Tuesday, January 5, 2010

        Thiruvadhirai Kali and Kootu

        Kali is a sweet rice recipe paired with Savoury Kootu on Thirvadirai. This festival was on Jan 1st this year.

        Thiruvadirai is one of the 27 stars or the "Nakshathirams" of Hindu astrological calender.One specialty about this day is the sighting of - Arudra or thiruvadirai star, considered auspicious by hindus. The festival, Thirvadirai, is celebrated in the month of Marghazi (November-December), on the day considered to be the ascent of thiruvadirai star. (Each day in the calender is associated to a specific star -one among the 27 stars in a hindu calender). People offer a rice based sweet dish to Lord Shiva - as he is associated with the Arudra star. Other star is sravanam or Thioruvonam is associated with Lord Vishnu.

        As part of the ritual, I made Thiruvadirai Kali and Mixed veg kootu for the day.

        Kali with roasted almonds and raisins

        You need: Serves 4
        Raw rice (I use brown) - 1cup
        Moong dal (with the skin)- 1cup
        Jaggery - 1/2cup (vary the quantity to suit your requirement)
        Shredded coconut - 2tbsp
        Elaichi powder - a pinch
        raisins - 2tbsp
        Roasted almonds - 2tbsp (coarse crushed)
        Ghee - 1/2 tbsp

        Process
        • Dry roast the rice until it turns crisp and you sense a faint aroma..this would take a minute or so...make sure you do not roast for long..it may turn the rice tasteless
        • Roast the moong dal for a minute or less.
        • Coarse grind rice and moong dal (helps in cooking faster)
        • Soak jaggery in a cup of water and strain it to remove sand and dirt
        • Pressure cook (two whistles) - the rice and moong dal with this jaggery water, 2 cups of water and pinch of salt (you may skip the salt), elaichi powder
        • Heat ghee in a kadai and add your raisins and almonds and mix it with the contents in the pressure cooker. Garnish with shredded coconut
        Basic difference between kali and Chakkarai pongal is that we dry roast ingredients for kali and use raw rice and dal for pongal.


        Kootu
        It is customary to cook a five or seven vegetable kootu for thirvadhirai. Odd numbers are considered auspicious in hinduism. This festive kootu calls for root vegetables ( I used roots vegetables and more!)

        You need: Serves 4

        Drum sticks - 2" pieces (say ten of them)
        yellow pumpkin - cubed- 1/4 cup
        Winter melon - cubed - 1/4 cup

        Potato- cubed - 1/4cup
        Yam (Suran)- cubed - 1/4 cup
        Cucumber - cubed - 1/4 cup
        Cluster beans - 1" pieces - 1/4 cup or less

        Fresh Peas or pre soak dry peas - 2tbsp
        Curry leaves - 8-9 
        Salt
        Hing/asafoetida - a pinch
        Turmeric powder - a pinch

        To Grind

        Red chilliles/green chillies - 4-5
        fresh coconut - shredded- 1/2cup
        Cumin seeds -2 tsps
        Corainder seeds - 1tsp
        tamarind pulp - 3tsps
        Chana dal - 1/2 tsp

        Tempering
        Mustard seeds- 1/2tsp
        Cumin - 1/4 tsp
        curry leaves - 4-5
        oil - 1/2tsp

        Process: 
        • Pressure cook all the vegetables with salt, turmeric powder and curry leaves
        • Roast corainder seeds, and chana dal grind them into a fine paste with fresh coconut, tamarind pulp, cumin, chillies 
        • Heat oil and temper mustard seeds, curry leaves and cumin  and your paste and vegetables and cook until all the ingredients blend evenly

        Hindu Mythology associated with the festival

        Ancient texts mention Arudra as being largest of the stars, even larger than the Sun. Tamil scholar Kandaswami Mudaliar said that Arudra star, if placed with in place of the Sun in our the solar system, would extend beyond the earth and touch Sevvai (Mars). The Aruda star is called Shiva Semporjyoti or Golden Red Flame due to its red brilliant appearance in the sky. Hindus believe that this radiant light denotes Lord Shiva's association to his function as one of the trinities (Vishnu, Shiva, Brahma). This day of marghazi,  Thiruvadirai star and new moon coincide, and that is when Lord shiva is said to perform his ecstatic dance, The Thandava. In Chidambaram in Tamil Nadu, a magnificant abhishekam is performed for Lord Natarajar. Kali is offered to the Lord and distributed as prasadam.

        Why Kali?
        A devotee called Sendanar could offer only kali. He had the habit of eating only the left overs from what ever was offered to Lord Shiva and later distributed among devotees. It is believed that Lord shiva himself came down to eat the humble kali offered in Nataraja’s sanctorum. From the day of that miracle, kali is considered the special offering to Lord Nataraja on Marghazhi Thiruvadirai.

        This day is also celebrated as the birth anniversary of  Saint Thiru Gnana Sambandar , in Seerkhazhi ,Tamil Nadu, India. Another Shiva bhakta, Saint Manickavachakar's birthday, also falls on this day.

        LinkWithin

        Related Posts with Thumbnails